Installing in Google Cloud Platform
Use this procedure to install the collector virtual appliance as a Google Compute Engine (GCE) instance in Google Cloud Platform (GCP). This procedure uses the gcloud tool to create a GCE instance.
Prerequisites
To perform this task, you need:
A GCP account with permission to create images and virtual machines in GCE.
A GCP project enabled for GCE.
A workstation with Google Cloud SDK installed.
The gcloud tool must be installed and initialized.
Procedures
You can configure your collector with IPv4 networking only or with dual-stack networking (IPv4 and IPv6). Perform only one of the following procedures:
Note
The procedures on this page use Bash shell conventions to set variables. Adjust as needed for other shells.
Install an IPv4-only collector
Log in to a shell that has Google Cloud SDK installed and the
gcloudtool initialized.Ensure that
gcloudand its components up-to-date.gcloud components update
Create a variable for the name of the instance to create.
List existing instance names.
gcloud compute instances list
Specify a name that is unique in your GCP environment.
In the following command, replace
INSTANCE-NAMEwith a new name:myName=INSTANCE-NAME
Create a variable for the GCE zone for the instance.
List available zones.
gcloud compute zones list
Select the zone that matches the location where the infrastructure and applications to monitor are running. In the following command, replace
GCE-ZONEwith the zone you select:myZone=GCE-ZONE
Create a variable for the GCE machine type to use.
List available types.
gcloud compute machine-types list
Select a type that meets your needs and all collector resource requirements
. For example,
n1-standard-4. In the following command, replaceMACHINE-TYPEwith the type you select:myMachine=MACHINE-TYPE
Create a variable for the GCE subnet to use.
List available subnets.
gcloud compute networks subnets list
Select the same address space as the infrastructure and applications to monitor. In the following command, replace
SUBNETwith the subnet you select:mySubnet=SUBNET
Create a variable for the GCP project to use.
List available projects.
gcloud projects list
Select a type that meets your needs. In the following command, replace
PROJECTwith the project you select:myProject=PROJECT
Create a variable for the location of the image to use.
Copy the following command and paste it in your shell:
zenossImage=https://www.googleapis.com/compute/v1/projects/zing-registry-188222/global/images/zenoss-collector-stable
Verify the variables you chose in steps 3-7.
env | grep -E '^my'
Create a new instance.
Copy the following command and paste it into your shell:
 gcloud compute instances create ${myName} \
--zone=${myZone} \
--machine-type=${myMachine} \
--subnet=${mySubnet} \
--image=${zenossImage} \
--boot-disk-size=25GB \
--boot-disk-device-name=collector-1 \
--project=${myProject}
Here is an example invocation:
 gcloud compute instances create zenoss-collector-1 \
--zone=us-central1-a \
--machine-type=n1-standard-4 \
--subnet=default \
--image=https://www.googleapis.com/compute/v1/projects/zing-registry-188222/global/images/zenoss-collector-stable \
--boot-disk-size=25GB \
--boot-disk-device-name=collector-1 \
--project=marketing
Install a dual-stack networking collector
Note
In step 10, you reserve a static external IPv6 address, which requires the subnet to have an assigned external IPv6 address range.
Log in to a shell that has Google Cloud SDK installed and the
gcloudtool initialized.Ensure that
gcloudand its components up-to-date.gcloud components update
Create a variable for the name of the instance to create.
List existing instance names.
gcloud compute instances list
Specify a name that is unique in your GCP environment. In the following command, replace
INSTANCE-NAMEwith a new name:myName=INSTANCE-NAME
Create a variable for the GCE region and zone for the instance.
List available zones.
gcloud compute zones list
Select the zone that matches the location where the infrastructure and applications to monitor are running. In the following command, replace
GCE-ZONEwith the zone you select:myZone=GCE-ZONE
In the following command, replace
GCE-REGIONwith the region of the corresponding zone previously selected:myRegion=GCE-REGION
Create a variable for the GCE machine type to use.
List available types.
gcloud compute machine-types list
Select a type that meets your needs and all collector resource requirements
. For example,
n1-standard-4. In the following command, replaceMACHINE-TYPEwith the type you select:myMachine=MACHINE-TYPE
Create a variable for the GCE subnet to use.
List available subnets.
gcloud compute networks subnets list
Select the same address space as the infrastructure and applications to monitor. In the following command, replace
SUBNETwith the subnet you select:mySubnet=SUBNET
Create a variable for the GCP project to use.
List available projects.
gcloud projects list
Select a type that meets your needs. In the following command, replace
PROJECTwith the project you select:myProject=PROJECT
Create a variable for the location of the image to use.
Copy the following command and paste it in your shell:
zenossImage=https://www.googleapis.com/compute/v1/projects/zing-registry-188222/global/images/zenoss-collector-stable
Verify the variables you chose in steps 3-7.
env | grep -E '^my'
Reserve an external static IPv6 address for the collector.
 gcloud compute addresses create ${myName}-external-ipv6 \
--region=${myRegion} \
--subnet=${mySubnet} \
--ip-version=IPV6 \
--endpoint-type=VM \
--project=${myProject}
Create a variable for the reserved static IPv6 address assigned to your subnet:
Retrieve the reserved address.
 gcloud compute addresses describe ${myName}-external-ipv6 \
--project=${myProject} \
--region=${myRegion} \
| grep 'address:'
Create the variable.
Replace
ADDRESSwith the IPv6 address that the previous command returns:myAddress=ADDRESS
Create a new instance.
Copy the following command and paste it into your shell:
 gcloud compute instances create ${myName} \
--zone=${myZone} \
--machine-type=${myMachine} \
--subnet=${mySubnet} \
--stack-type=IPV4_IPV6 \
--external-ipv6-address=${myAddress} \
--external-ipv6-prefix-length=96 \
--ipv6-network-tier=PREMIUM \
--image=${zenossImage} \
--boot-disk-size=25GB \
--boot-disk-device-name=collector-1 \
--project=${myProject}
Here is an example invocation:
 gcloud compute instances create zenoss-collector-1 \
--zone=us-central1-a \
--machine-type=n1-standard-4 \
--subnet=default \
--stack-type=IPV4_IPV6 \
--external-ipv6-address=2001:db8:4b55:1900:0:77:: \
--external-ipv6-prefix-length=96 \
--ipv6-network-tier=PREMIUM \
--image=https://www.googleapis.com/compute/v1/projects/zing-registry-188222/global/images/zenoss-collector-stable \
--boot-disk-size=25GB \
--boot-disk-device-name=collector-1 \
--project=marketing
Note on Metadata Settings
Access to the collector appliance menu is controlled by SSH keys. The enable-oslogin metadata key with a value of TRUE will break SSH access, resulting in a Permission denied (publickey) error. To resolve, remove the enable-oslogin entry or add enable-guest-attributes with a value of TRUE.
Optional: Additional SSH keys
GCP Compute Engine uses key-based SSH authentication to establish connections to the collector host. The native SSH key metadata management inherits keys attached to the project. You can store additional SSH keys in the Compute Engine instance metadata.
Procedure
In Google Cloud Console, navigate to your virtual machine.
At the bottom of the page, click Edit.
Under SSH Keys, click Add item.
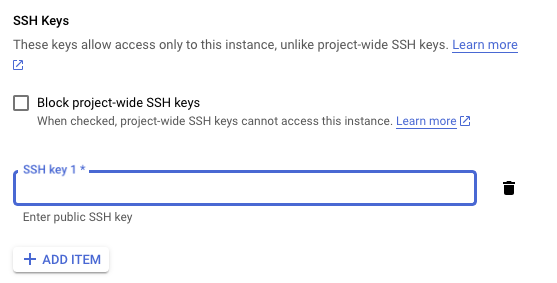
Add your public key into the text box. The key must be in one of the following formats:
Key format with no expiration time:
KEY_VALUE USERNAMEKey format with expiration time:
KEY_VALUE google-ssh {"userName":"USERNAME","expireOn":"EXPIRE_TIME"}
Replacing:
KEY_VALUEwith the public key value.USERNAMEwith your username.EXPIRE_TIMEwith the time the key expires in ISO 8601 format, for example,2023-08-07T17:30:00+0000.
Optional: Set additional DNS search domains
You can customize DNS resolution for your virtual machine and grant access to additional users. The following options are supported:
Additional DNS forwarding/DNS search domain entries
A default resolver other than the one provided by GCP
Additional SSH public keys
Example
FIXME TRANSCLUSION: reuse _metadata.md here (wire with fix_paligo_links.py transclusions)
Then, add the object to the metadata section of your virtual machine configuration in the Google Cloud Console with the key collector-userdata.
Procedure
Create a JSON object that includes the options you wish to enable.
See the previous section
for an example JSON object.
In Google Cloud Console, navigate to your virtual machine.
At the bottom of the page, click Edit.
In the Metadata area, click ADD ITEM, and then configure the user data.
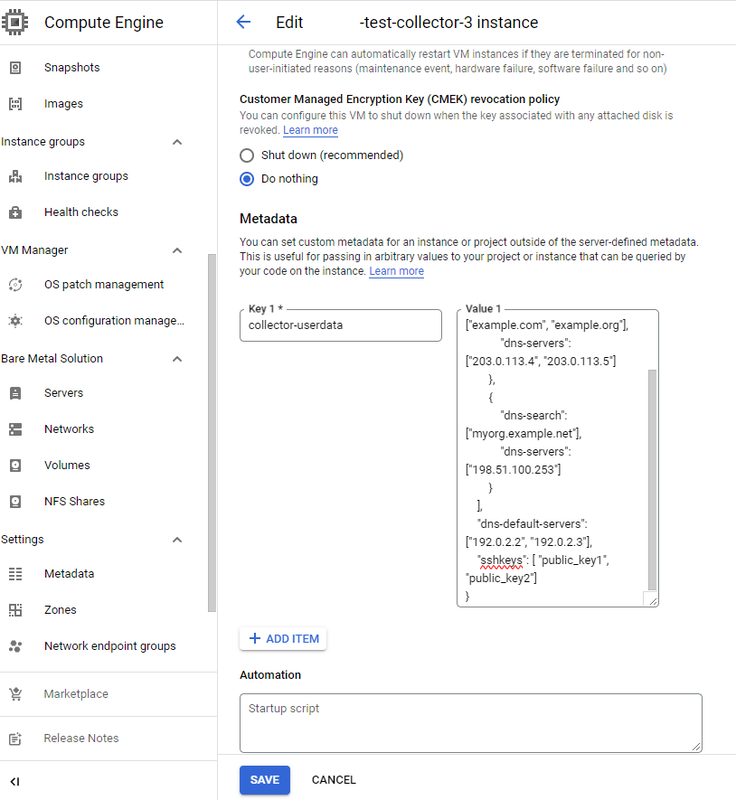
In the Key 1 field, add
collector-userdata.In the Value 1 field, paste your JSON object.
At the bottom of the page, click Save.
Reboot the virtual machine.
Optional: Enable Shielded VM Security Features
You can enable GCP Shielded VM features on the collector appliance VM and Virtana recommends that you do. These GCP features offer verifiable integrity of your Compute Engine VM instances, so you can be confident your instances haven't been compromised by boot- or kernel-level malware or rootkits. For more information about the security benefits, refer to Google's documentation.
Example Procedure
The procedure requires stopping the VM, making the configuration changes, and then starting it again.
 gcloud compute instances stop zenoss-collector-1 --project=marketing --zone=us-central1-a
gcloud compute instances create zenoss-collector-1 \
--project=marketing \
--zone=us-central1-a \
--shielded-vtpm \
--shielded-integrity-monitoring \
--shielded-secure-boot
gcloud compute instances start zenoss-collector-1 --project=marketing --zone=us-central1-a
Once the virtual machine reboots, you can verify these options are in place as follows:
 gcloud compute instances describe zenoss-collector-1 \
--project=marketing \
--zone=us-central1-a \
--format="table(name, zone, \
shieldedInstanceConfig.enableSecureBoot:label=SECURE_BOOT, \
shieldedInstanceConfig.enableVtpm:label=VTPM, \
shieldedInstanceConfig.enableIntegrityMonitoring:label=INTEGRITY)"
Next step
Connect to a Collection Zone (Initializing a collector appliance
).