Add a destination
Note
Your account must be assigned the Manager role to create and manage destinations.
Log in to Virtana Service Observability as a user with the Manager role, open the ADMIN > Actions page, and then click the DESTINATIONS tab.
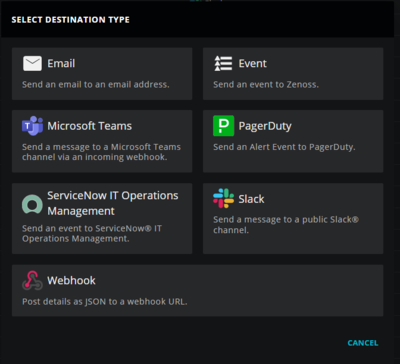
Click ADD DESTINATION. On the SELECT DESTINATION TYPE box that opens, click the destination type you want to use, for example, Event or Webhook.
The ADD DESTINATION dialog box opens and updates to include destination detail fields and unique configuration fields for the destination type you selected.
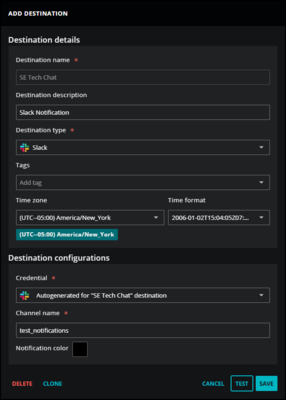
Specify the destination details.
Field
Required?
Description
Destination name
Yes
A unique, short identifier for the destination. The name can't be changed after the ADD DESTINATION dialog box is saved.
Destination description
No
Text to describe the destination.
Destination type
Yes
The type to create.
Available externally
No
Controls whether users can select this destination when they send events manually in the Events console. This option is next to Destination type and is turned off by default.
When the option is on, the destination appears in the Send notification list in the Events console, and users with the User role can send up to 10 selected events to it at a time. When this option is is off, the destination doesn't appear in that list.
Triggers and automated actions use the destination the same way whether the option is on or off, so turning it off doesn't stop automated notifications. Turn it on for a destination you want used two ways: automatically when a trigger matches an event, and manually when a user decides an event needs attention in the target system, such as opening a ticket.
Tags
No
A list of arbitrary terms to associate with the destination.
Time zone
No
Select a time zone in Coordinated Universal Time (UTC) format. For example, if you want to associate your destination with US Central Standard Time, select
(UTC–06:00) America/Chicago. The default is(UTC–05:00) America/New_York.Time format
No
Select a time format to associate with the destination. Options include:
RFC-3339:
2006-01-02T15:04:05Z07:00— This is the default.RFC-1123:
Mon, 02 Jan 2006 15:04:05 MSTRFC-822:
02 Jan 06 15:04 MSTANSI C:
Mon Jan_2 15:04:05 2006
Specify the destination configurations. To view the field descriptions, click the link of your corresponding destination type in the following list:
(Optional) To test the destination, click TEST.
Virtana Service Observability sends a test message to the new destination but does not save it.
Click SAVE.