AI Configuration
What is AI Configuration?
Use AI Configuration to connect Virtana IO to an AI provider such as OpenAI, Anthropic, or Google Gemini. After you configure a provider, Virtana IO can send requests to the provider's AI model and use the responses in the product.
On this page, you can:
Enter the API key that authenticates Virtana IO with your provider.
Show advanced settings to specify a custom endpoint (Base URL) and model parameters.
Route requests through a proxy server if your appliance has no direct internet access.
Test the connection before you save to confirm that Virtana IO can reach the provider.
Each provider and model supports a different set of configuration values, so the exact settings you need depend on the provider you connect to.
Configure your AI provider
Follow these steps to set up your AI provider in Virtana IO.
Basic configuration (OpenAI only)
For OpenAI, enter only your API key. Follow these steps for basic setup.
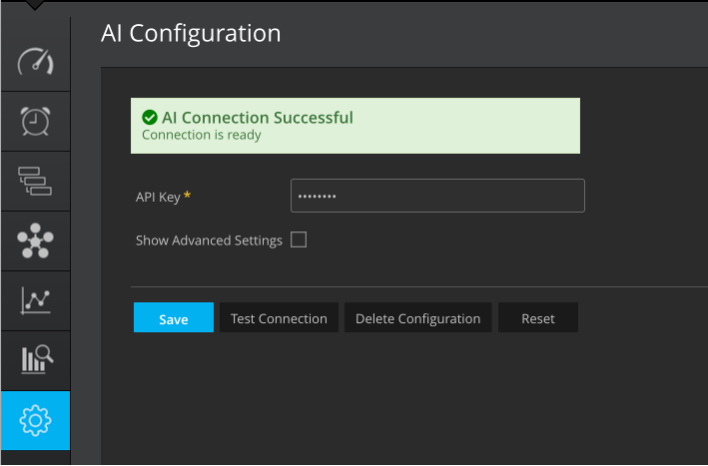
In the Virtana IO interface, navigate to Settings>AI Configuration.
In the API Key field, enter your authentication credential from your AI provider.
Obtain this key from your AI provider account.
Enter the full token or key string as provided by your provider.
Virtana IO encrypts and securely stores the key.
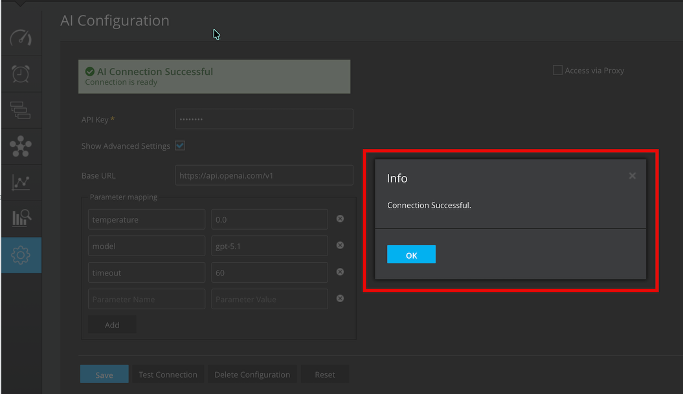
Click Test Connection to validate your API key and connection, and wait for the connection test to complete.
If successful, an Info dialog opens with the message Connection Successful. Click OK to close the dialog.
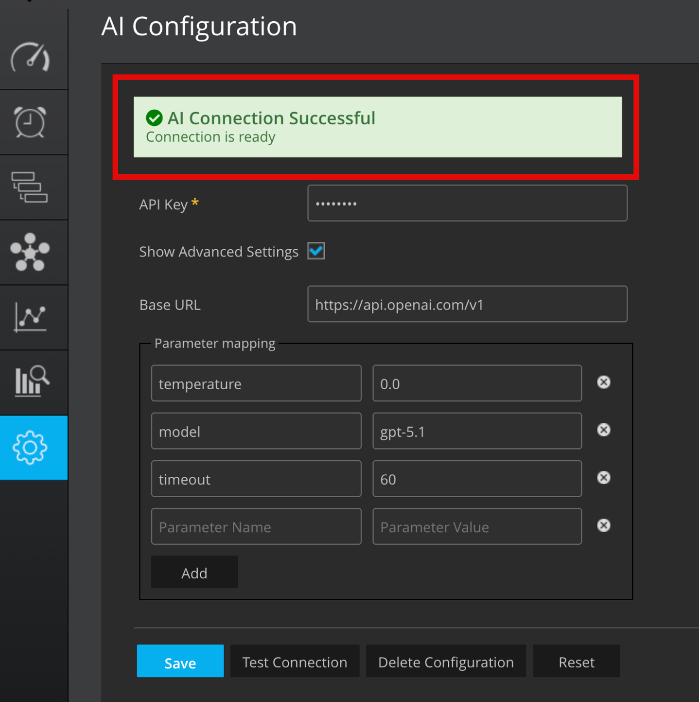
A green AI Connection Successful banner also appears at the top of the page.
Click Save to store your configuration.
Virtana IO can send AI requests through the configured provider.
Advanced configuration
The basic configuration works for most users who connect to OpenAI using an API key. Advanced configuration gives you finer control when the default connection does not fit your environment or requirements.
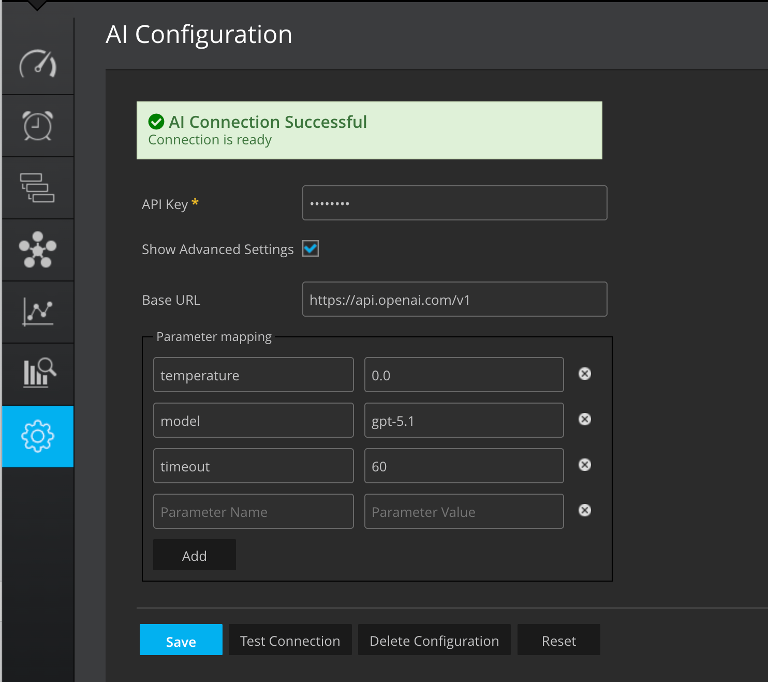
Enable advanced settings
Navigate to Settings>AI Configuration.
Select the Show Advanced Settings checkbox.
The page displays additional fields: Base URL and Parameter mapping.
Configure the Base URL
If you are using a custom proxy, a private model deployment, or an alternative provider-compatible service, specify the API endpoint.
In the Base URL field, enter the API endpoint for your AI provider.
Example for OpenAI: https://api.openai.com/v1
Contact your AI provider or administrator if you are unsure of the correct endpoint.
Add a parameter
To add a model parameter, complete the following steps. You must have advanced settings enabled.
In the Parameter mapping section, click Add. A new key-value row appears.
In the left field, enter the parameter name (for example, temperature).
In the right field, enter the value for that parameter (for example, 0.2).
Repeat these steps for each parameter you want to add.
To remove a parameter, click the delete icon (x) at the end of its row.
Click Test Connection to confirm that your parameters are valid.
Click Save to store your configuration.
Parameter mapping
Parameter mapping lets you define model-specific parameters that control how the AI model processes requests. Each parameter is a key-value pair that you add to the Parameter mapping section of the AI Configuration page.
The allowed parameters vary by model and provider. Your model administrator should provide a list of valid parameters for your specific AI provider and model. To reset the parameters to their default values, click Reset.
The following table shows common parameters and example values for different AI providers.
Parameter | OpenAI | Gemini |
|---|---|---|
temperature | 0.2 | 0.4 |
timeout | 60s | 60s |
model | gpt-5.5 | gemini-3.5 flash |
max_tokens | 2000 | 2000 |
top_p | 0.9 | 0.95 |
Action buttons
Use the buttons at the bottom of the page to test, save, reset, or delete your configuration.
Button | Function |
|---|---|
Save | Stores the current configuration and applies it to the system. |
Test Connection | Sends a test request to the provider to confirm that your API key, endpoint, and parameters are valid. Does not save your changes. |
Delete Configuration | Removes all AI settings from the system. This action cannot be undone. |
Reset | Restores the fields to their last saved values and clears unsaved parameter changes. |
Test the connection before you save. A saved configuration that fails the connection test does not work until you correct it.
Configure access via proxy
If your IO appliance does not have a direct internet connection, you can route requests to external LLM provider URLs through a proxy server.
Prerequisite: A proxy server must already be set up on your IO appliance.
Navigate to Settings>AI Configuration.
Select the Access via Proxy checkbox.
In the Proxy Server list, select an existing proxy server, or configure a new one.
To use a proxy server that is already configured, select it from the Proxy Server list.
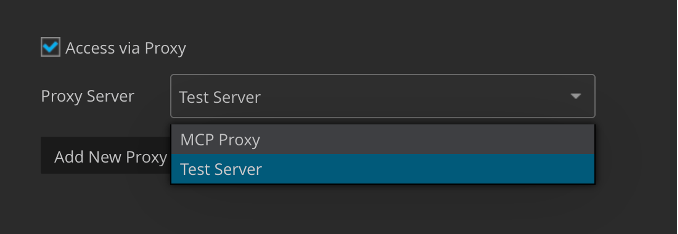
To add a new proxy server, click Add New Proxy. The New Proxy Server dialog opens.
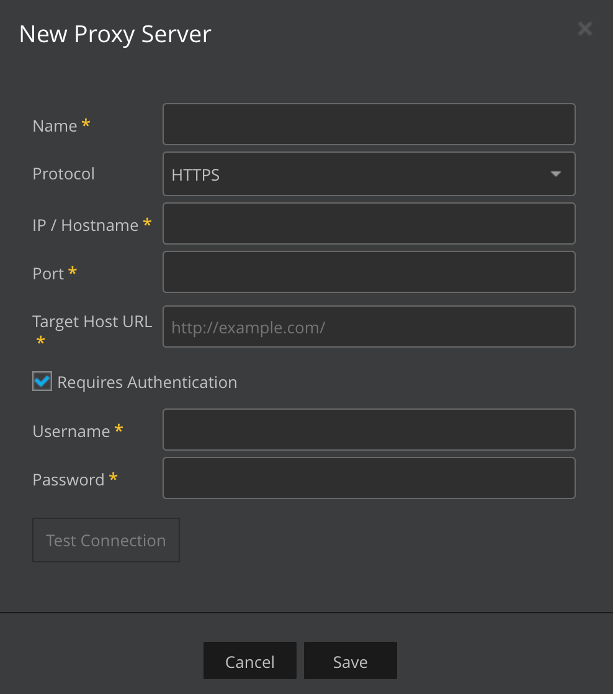
In the New Proxy Server dialog, enter the proxy server details.
Click Test Connection to verify that the proxy server is reachable.
Click Save to store the proxy server configuration.
Field | Description |
|---|---|
Name | Required. A label that identifies the proxy server in the Proxy Server list. |
Protocol | The protocol used to reach the proxy server. Default: HTTPS. |
IP / Hostname | Required. The IP address or hostname of the proxy server. |
Port | Required. The port on which the proxy server listens. |
Target Host URL | Required. The destination URL that the proxy forwards requests to, for example, http://example.com/. |
Requires Authentication | Select if the proxy server requires credentials. Displays the Username and Password fields. |
Username | Required if Requires Authentication is selected. The username for the proxy server. |
Password | Required if Requires Authentication is selected. The password for the proxy server. |
Troubleshooting
If the connection test fails, use the following table to identify the cause and the remedy.
Symptom | Likely cause | Remedy |
|---|---|---|
Error dialog: “Connection Failed: Resource not found. Please verify the base URL and endpoint are correct.” | The Base URL is incorrect. | In the Base URL field, verify the endpoint against your provider's documentation, then click Test Connection again. |
Error dialog: “Connection Failed.” | One or more parameter names in the Parameter mapping section are invalid or misspelled. | In the Parameter mapping section, verify each parameter name against the values your model administrator provided. Correct or remove any invalid parameter, then click Test Connection again. |
Error dialog: “Connection Failed: HTTP error -1: Failed to list available models... java.net.ConnectException” (with Access via Proxy selected) | The proxy server cannot reach the provider, or the proxy details are incorrect. | Verify the proxy server's IP / Hostname, Port, and Target Host URL. Confirm the proxy can reach the internet, then click Test Connection again. |