Brocade SAN Integration
Collect SAN metrics using Brocade SANnav, SMI-S, and SNMP-SSH.
 |
The Brocade SAN integration is an agentless software solution that utilizes storage and network information from information from SANnav Management Portal (SANnav), Storage Management Initiative Specification (SMI-S), and SNMP MIB (management information base) to gather switch performance and link error statistics in a non-intrusive manner. These switch statistics are correlated with other system-wide metrics, as well as metrics from other integrations. This integration supports Brocade Fibre Channel switches, creating an unbiased view of switch port performance. IO utilizes this data to track switch performance, identify oversubscribed resources, conduct historical trending analysis, and alert administrators of link error problems or performance bottlenecks.
Note
Access Gateway switch ports that are connected to the core switch are missing the WWNs.
Configuring a Brocade SAN Integration for BNA SMI-S Discovery
Prerequisites
Before configuring an instance of a Brocade SAN Integration where BNA (SMI-S) discovery will be used, it is recommended that the heap size be adjusted from the default 1GB to one of the settings indicated in the table below. Open the file $INSTALLDIR/conf/cimomsvc.conf, locate the line that contains set.MAX_HEAP_SIZE and change it to set.MAX_HEAP_SIZE=N, where N equals the heap setting shown below, which is based on the number of Brocade SAN Integration ports to be configured.
# of Brocade SAN Ports to be Configured | BNA Heap Setting |
|---|---|
1 - 1,000 | 1GB |
1,002-2,560 | 2GB |
> 2,560 | 4GB |
Before configuring an instance of a Brocade SAN Integration where BNA (SMI-S) discovery will be used, make sure that BNA has completed its discovery.
If you are using Brocade Network Advisor (BNA) network management tool for discovery, you need to configure SMI-S.
From the Settings screen, click Integrations in the Probes and Integrations section.
The Integrations screen is displayed.
Click View for the integration.
The Brocade SAN screen is displayed.
Click New.
The New Brocade SAN screen is displayed.
Enter a name for the integration discovery instance.
A name is required. The Name field can be edited after the configuration is saved.
Select the Brocade Network Advisor (BNA) Discovery Mode.
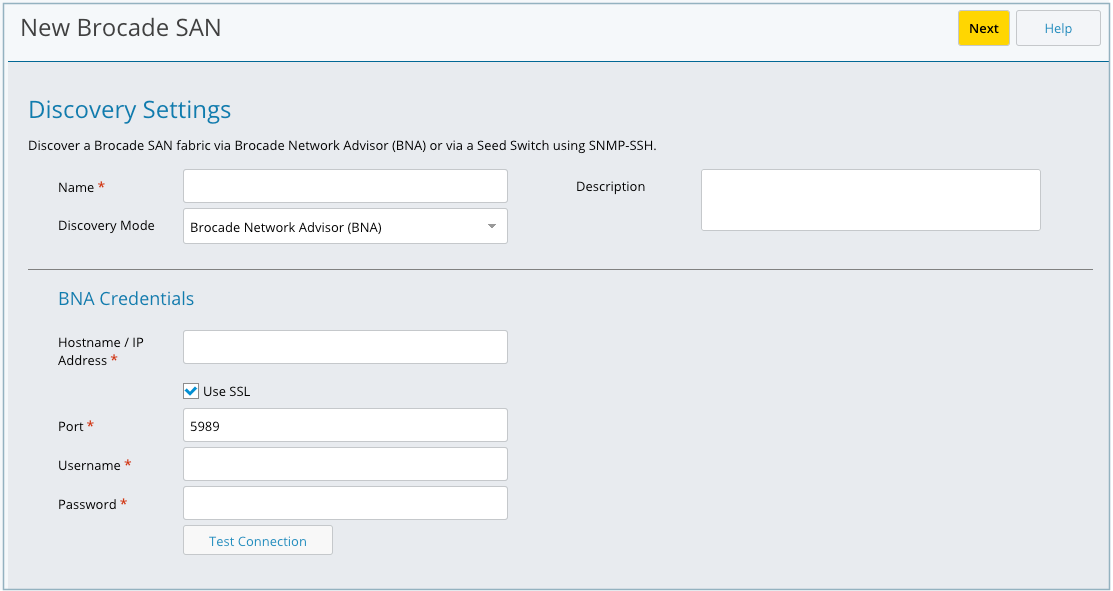
Complete the rest of the information on the New Brocade SAN screen as follows:
Field
Definition
Hostname / IP Address
Hostname or IP address of the SMI-S provider.
Use SSL
Enables or disables use of SSL for login.
Port
Port of the SMI-S provider. If the SSL check box is selected, the port is 5989. If the SSL check box is not selected, it is port 5988.
Username
Username of the SMI-S provider, for example, the username for the Brocade BNA.
Password
Password of the SMI-S provider, for example, the password for the Brocade BNA.
Click Test Connection to verify the connection.
IO tests the connection (hostname and credentials) and tries to find all the switches. This process can take up to five minutes.
Click Next.
Discovery begins for all the switches accessible. This process can take several minutes, depending on the number of switches to be discovered.
The New Integration page opens to display the Configuration tab.
The Namespace field is auto-detected.The Vendor,Hostname/IP, Port, Username,Password, and Use SSL fields are carried over from the previous screen. The Name field is user-configurable.
Enable or disable scheduled discovery.
By default, regularly scheduled discovery is enabled for Brocade SAN Integration configurations. If you would like to disable regularly scheduled discovery, uncheck the Enable scheduled discovery check box. If you would like to have discovery scheduled regularly, keep the box checked and choose a discovery frequency and time of day. By default, the frequency and time of day for Brocade SAN Integration is every other day and 2am appliance time.
Click Save.
Click on the SNMP Sources tab on the New Integration page.
A list of available auto-detected SNMP switch sources displays.
Select the switches you want to use with the integration and click Add.
You can configure multiple switches at one time. The columns headings in the Switches table are defined as follows:
Table 235. Switches Table FieldsFields
Definition
Switch Name
Auto-detected name of the switch.
Port Count
Active port count.
Status
Discovered, Configured, Subscribed.
Last Metrics Collection
Date and time of last metrics collection, Collecting metrics for metrics collection in progress, metrics collection failed, or no collection for no collection.
You are notified if an Integration fails to collect metrics for two hours. The notification takes the form of a IO Health Notification as well as an email notification.
Metrics Polling Interval
Metrics polling interval set for the switch.
Error
Configuration or subscription errors. Mousing over an error displays a tooltip containing the error text.
With the switches still selected, click Configure.
If you selected one switch, the Switch Configuration dialog box displays. Proceed to Step 14.
If you selected more than one switch, the Bulk Switch Configuration dialog box displays. Proceed to Step15.
If you select one switch, enter the values in the Switch Configuration dialog.
The Name, Vendor, IP, SNMPVersion are auto-detected. You can override the IP and SNMP Version. If auto-detect for the IP address failed, you must enter the IP address. Depending on the SNMP version detected, there might be more or less values to fill in.
The values in the other fields are filled out with default values. You can edit these fields, but it is recommended that you keep the default values provided. In some cases, such as when SNMP version 3 usernames and passwords are required, we cannot provide defaults, and you have to enter the information manually.
Proceed to Step16.
If you select two or more switches, select the properties to configure in the Bulk Switch Configuration dialog.
Click OK.
With the switches still selected, click Subscribe.
When you click Subscribe, IO validates that there are sufficient licenses.
Click Save to save all of your changes.
The Discovery dialog box displays, asking if you want the discovery process to start upon saving. Immediate discovery is recommended, as no metrics are collected until discovery is complete.
Click Yes to start immediate discovery.
After clicking yes, you are returned to the main grid of all configurations, and the integration that you just created has "Discovering…" in its last discovery time column.
If you drill down into the configuration again, a banner displays on your screen saying that discovery is taking place. While the discovery is taking place you are in read-only mode. You cannot make any changes to the integration or switch configuration.
Note
If discovery completes with the error, “Illegal action: attempt to associate archived parent,” re-run discovery on the integration configuration that failed for it to unarchive the port.
Configuring a Brocade SAN Integration for SNMP-SSH Discovery
When configuring Brocade SAN for SNMP over SSH, you configure a “seed switch”. From that switch, other interconnected switches on the network can be discovered, so you do not have to add and configure each switch individually.
Prerequisites
Because Brocade zoning information is not available through SNMP, IO discovers it via SSH by running the FOS commands shown below. IO also discovers virtual fabrics using SSH. This is required to discover switches in other virtual fabrics. IO requires a user with the chassis role of "user" and read-only access to the switches to run these commands.
FOS Command | Purpose |
|---|---|
lscfg -show | Discover virtual fabric ID; used to discover switches in other fabrics |
fabricshow -chassis | Discover chassis WWN and name |
zoneshow | Discover zone, zone set and zone aliases |
fcrproxydevshow -a lsanzoneshow -s | Discover proxy FC ports (routed fabrics) |
Note
An NPV-enabled switch cannot be used as a seed switch. Also, a Brocade Access Gateway cannot be used as a seed switch.
Note
IO assumes the fabric will have the same SSH credentials as the seed switch. If the credentials are not the same as the seed switch, the switches will not be discovered. To add switches with different credentials, there is an option to manually add switches. Refer to the Adding Switches to the SNMP Sources List section for more information.
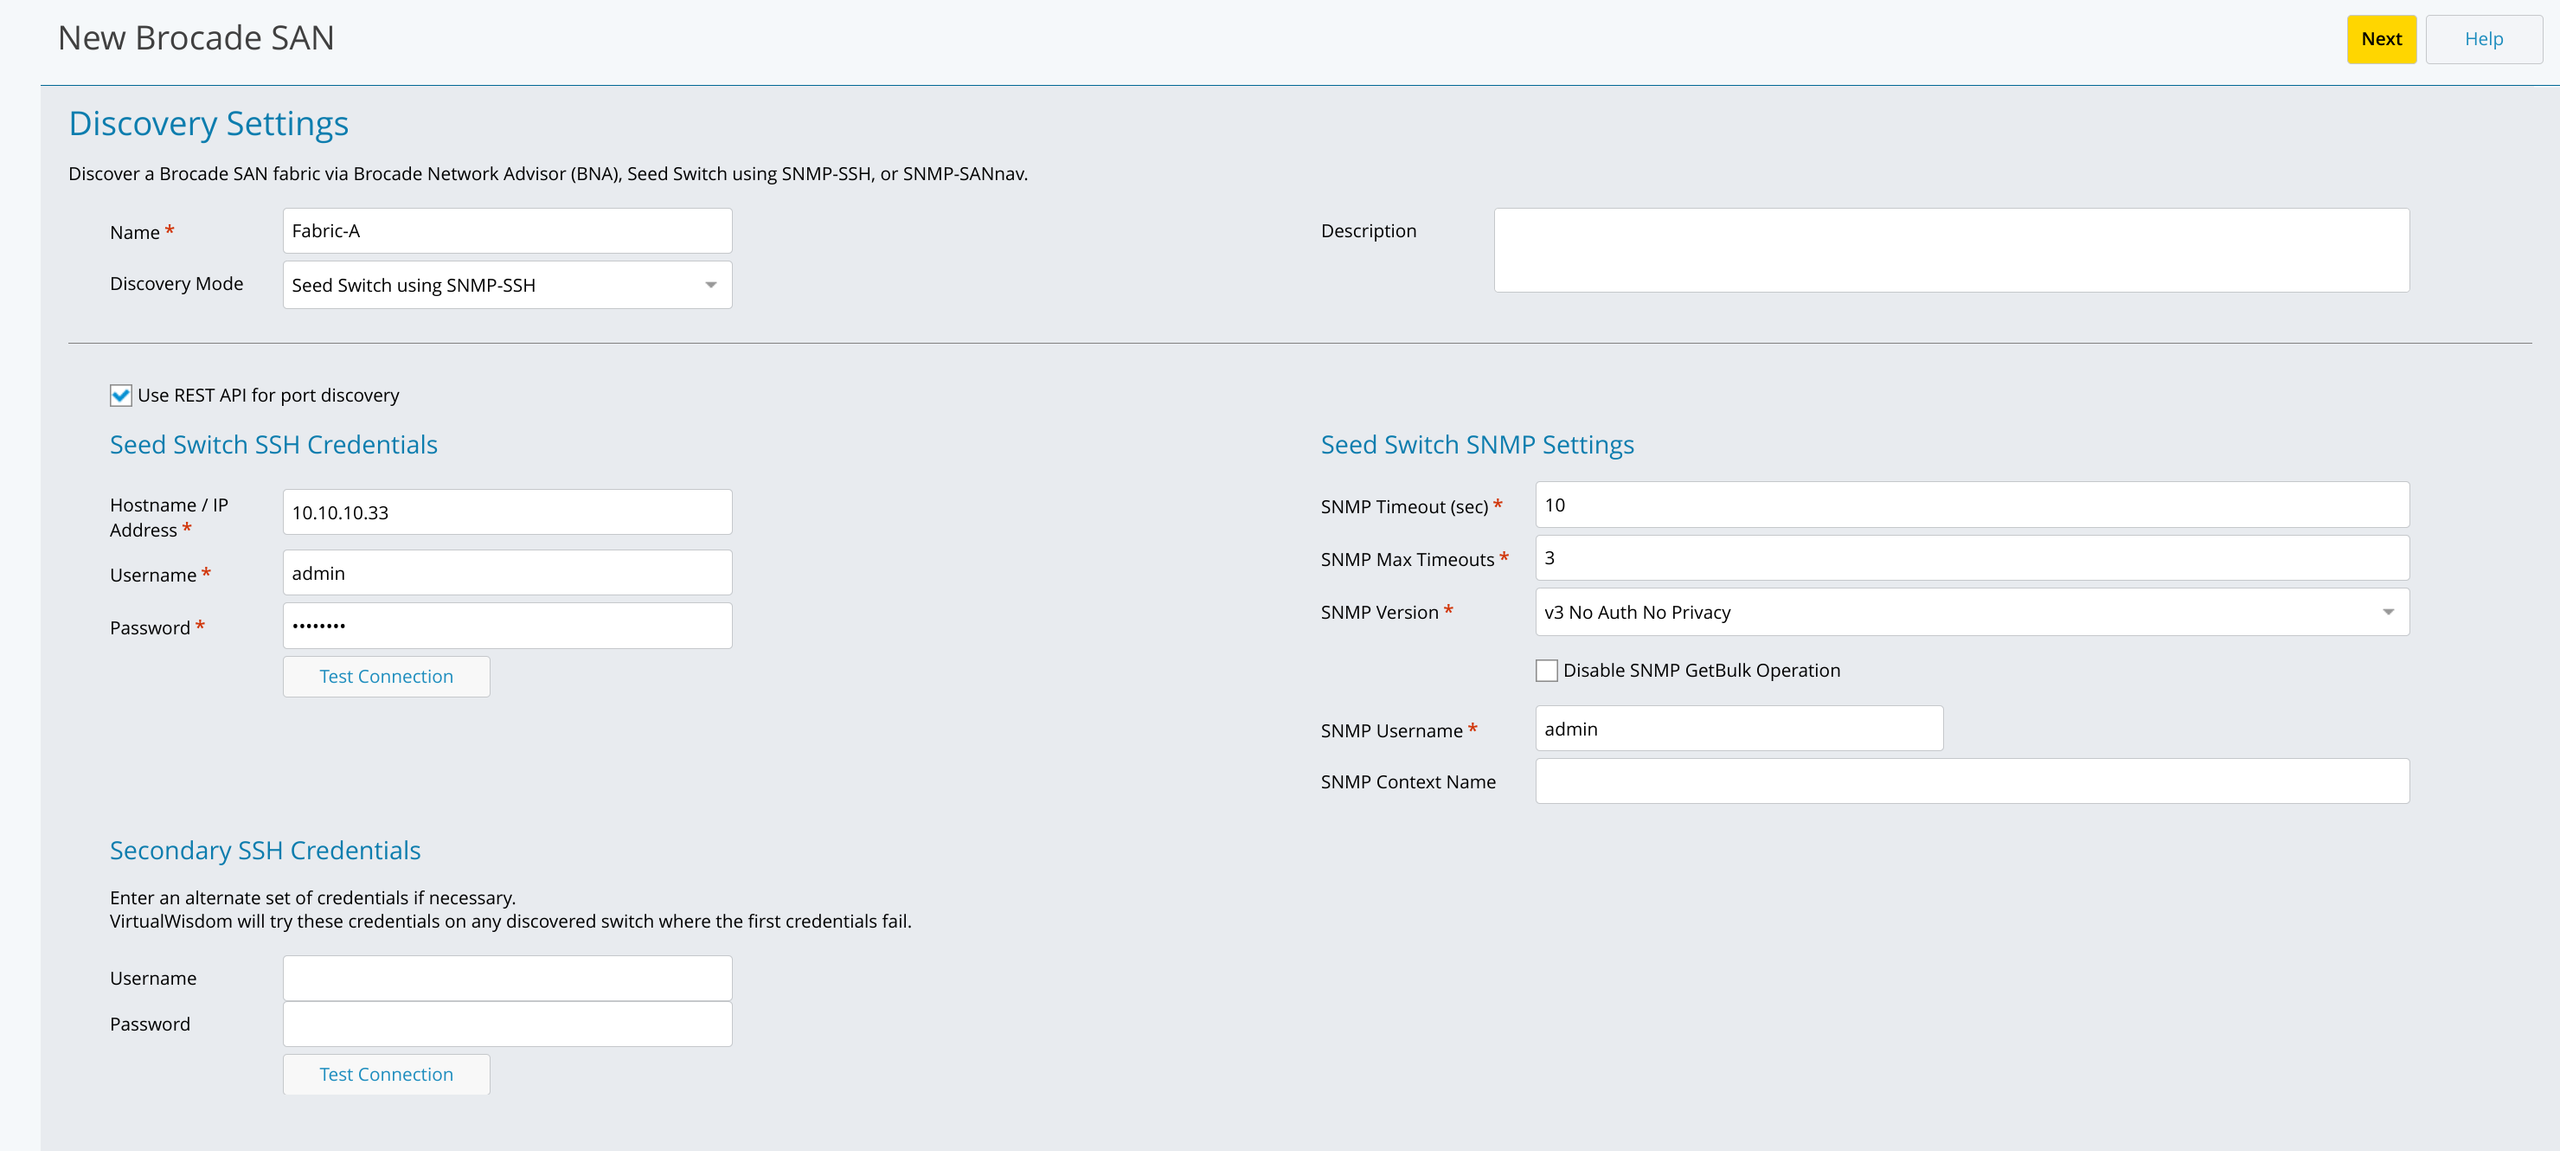
From the Settings screen, click Integrations in the Probes and Integrations section.
The Licensed Integrations screen is displayed.
Click View for Brocade SAN.
The Brocade SAN screen is displayed.
Click New.
The New Brocade SAN screen displays, with some default settings.
Enter a name for the integration discovery instance.
A name is required. The Name field can be edited after the configuration is saved.
In the Discovery Settings section of the window, select Seed Switch using SNMP-SSH from the Discovery Mode drop-down menu.
You can provide an optional Description.
Enable or disable the REST API option for switch port discovery.
This feature uses the SSH credentials for accessing the REST API and collects information and discovers the ports, instead of using SNMP By default this feature is turned off.
Note
This is an experimental feature. Enabling it will only discover port information using the REST API; all other data discovery and collection will continue to use SNMP as the source.
Note
This feature is applicable with IO 7.2.6 and later versions.
Enter the Seed Switch SSH Credentials.
Field
Definition
Hostname / IP Address
Hostname or IP address of the switch.
Username
Username of the switch.
Password
Password of the switch.
Click Test Connection to verify that the switch is accessible with provided credentials.
Optional: Enter Secondary SSH Credentials and test the connection.
Verify or modify the Seed Switch SNMP Settings.
Field
Definition
Comments
SNMP Timeout (sec)
The timeout in seconds between retries
10 is default
Accepts an integer from 1 to 1,000
SNMP Timeout multiplied by SNMP Max Timeouts cannot exceed half of the Polling Interval.
SNMP Max Timeouts
Maximum number of retries
3 is default
SNMP Version
v1
v2c (default)
v3 (Auth Privacy, Auth No Privacy, or No Auth No Privacy options)
Community
Default is public
Only applies to v1 and v2c
SNMP Username
Required for all SNMPv3
SNMP Context Name
Optional for all SNMPv3
SNMP Auth Password
Optional for v3 Auth Privacy or No Privacy
SNMP Auth Protocol
Optional for v3 Auth Privacy or No Privacy
SNMP Privacy Password
Optional for v3 Auth Privacy
SNMP Privacy Protocol
Optional for v3 Auth Privacy
Enable or disable the SNMP GetBulk operation.
This feature is available only for SNMP versions v2c and v3.
GetBulk is enabled by default, and keeping this option enabled is recommended.
Click Next.
Discovery begins for all the switches accessible to the seed switch. This process can take several minutes, depending on the number of switches to be discovered.
The New Integration page opens to display the Configuration tab.
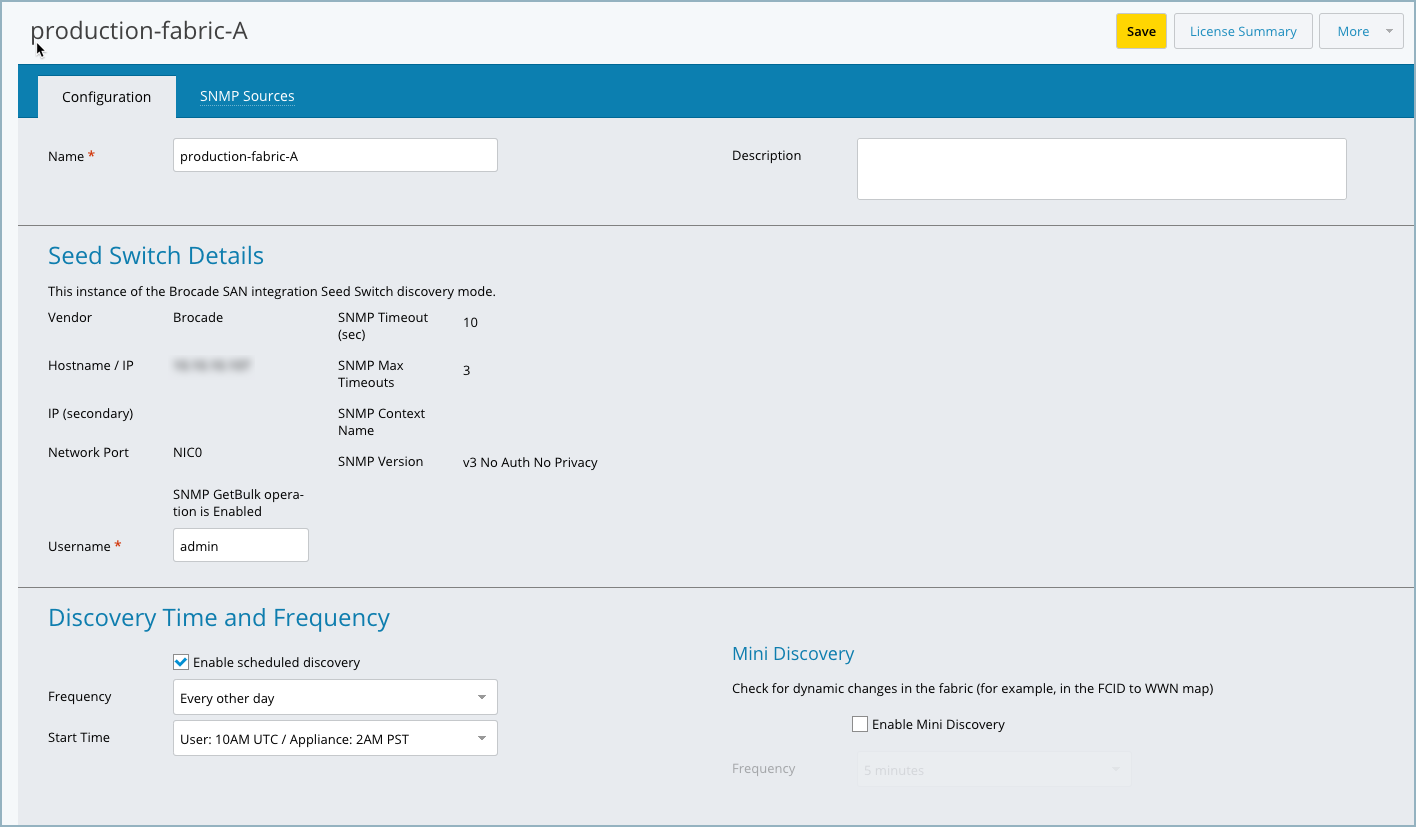
Enable or disable Discovery Time and Frequency.
By default, regularly scheduled discovery is enabled for integration configurations. If you would like to disable regularly scheduled discovery, uncheck the Enable scheduled discovery check box.
If you would like to have discovery scheduled regularly, keep the box checked and choose a discovery frequency and time of day. By default, the frequency and time of day is every other day and 2am appliance time.
Enable or disable Mini Discovery.
This setting is disabled by default.
Mini Discovery checks for dynamic changes in your fabric.
If you enable Mini Discovery, you must select a frequency.
Click on the SNMP Sources tab on the New Integration page.
Switches that are connected to the seed switch are discovered and listed in the SNMP Sources table.
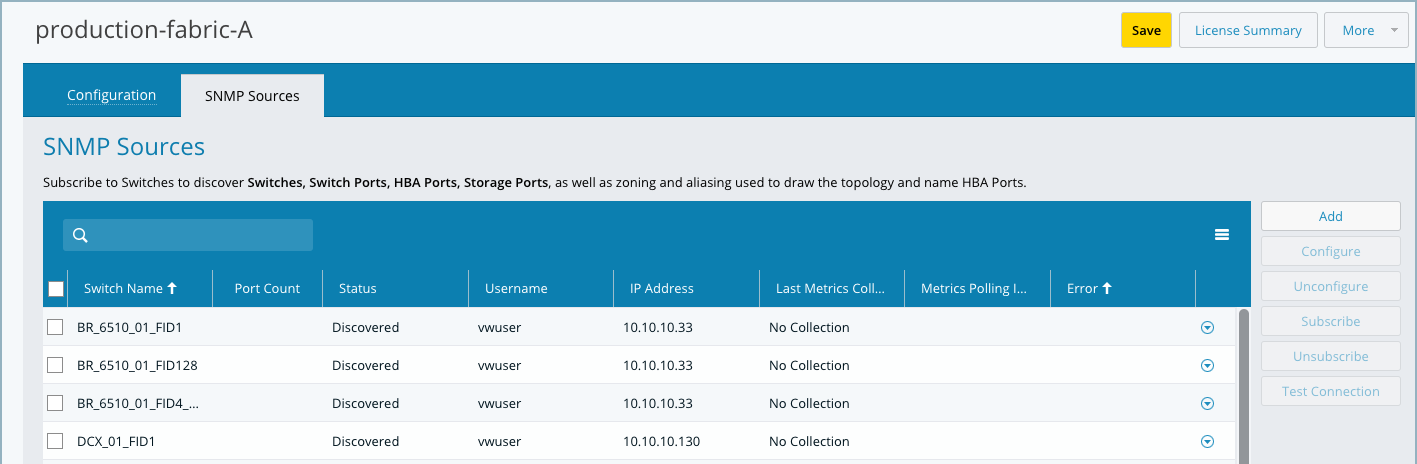
Select the switches you want to use, and then click Configure.
You can configure multiple switches at one time.
If you selected one switch, the Switch Configuration dialog box displays. Proceed to Step 16.
If you selected more than one switch, the Bulk Switch Configuration dialog box displays. Proceed to Step 17.
If you select one switch, enter the values in the Switch Configuration dialog.
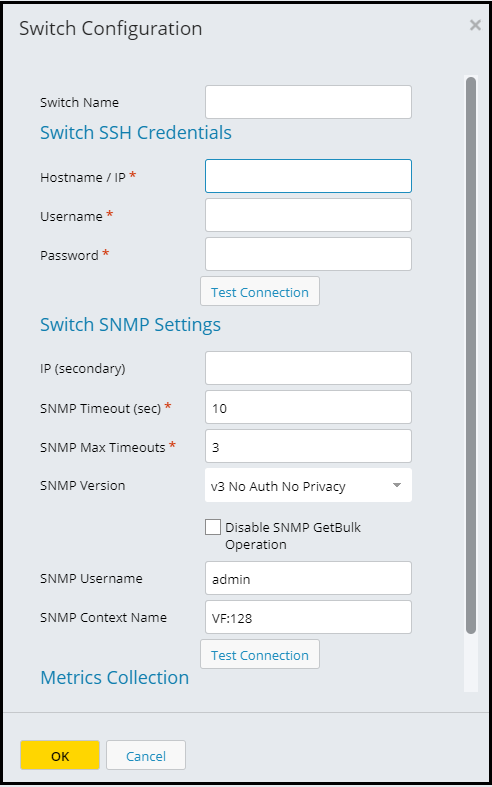
SSH credentials are pre-populated and the Password is encrypted.
Verify the Switch SNMP settings for the switch you intend to configure, and fill in the appropriate details.
When selecting the SNMPv3 provide the SNMP Username.
When a single switch is being configured and discovered with a logical fabric, then the SNMP Context Name must be set appropriately. This only configures and discovers the switch with the specified Context Name.
Example: Brocade switch has FID-1 needs to be configured with SNMP Context Name as ‘VF:1’.
When multiple switches are being configured and discovered, keeping the SNMP Context Name field blank is recommended, so all switches are discovered.
Proceed to Step 18.
If you select two or more switches, select the properties to configure in the Bulk Switch Configuration dialog and click Next.
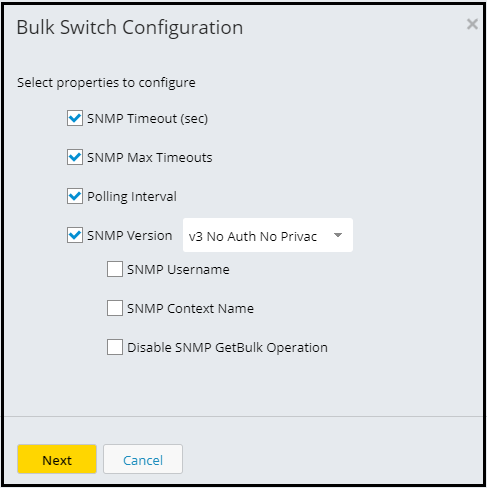
A configuration dialog box displays with configurable fields.
Select the appropriate SNMP version.
When selecting the SNMPv3, provide the SNMP Username and the SNMP Context Name (optional).
With SNMP v1, the default username is public.
Confirm or modify the configuration settings and click OK.
The status of the switches changes to Configured in the SNMP Sources table.
Select the switches for which you want metrics and click Subscribe.
Subscribing to the switches starts the polling for metrics.
Integration licenses must be available to subscribe.
Click Save to save all of your changes.
The Start Discovery dialog box displays so you can initiate a discovery of the integration. VI recommend starting a discovery. Completing the discovery successfully creates the entities.
Click Yes to start a full discovery.
After clicking yes, you are returned to the Brocade SAN page that lists all configurations, and the integration that you just created has "Discovering…" in its Last Discovery column.
If you drill down into the configuration again, a banner displays on your screen saying that discovery is taking place. While the discovery is taking place you are in read-only mode. You cannot make any changes to the integration or switch configuration. A message similar to the following displays:
First-time discovery started at <date> <time>. This could take several hours to complete.
Note
If discovery completes with the error, “Illegal action: attempt to associate archived parent,” re-run discovery on the integration configuration that failed for it to unarchive the port.
Check the SNMP Sources list to verify that all switches you want to subscribe are listed and have the status Subscribed.
If a switch you want does not appear in the table, see Adding Switches to the SNMP Sources List.
Configuring a Brocade SAN Integration for SANnav Discovery
Before configuring an instance of a Brocade SAN Integration where SANnav discovery will be used, make sure that SANnav has completed its discovery. Also, the following MIBs need to be enabled: FE-MIB, SW-MIB, and IF-MIB.
From the Settings screen, click Integrations in the Probes and Integrations section.
The Integrations screen is displayed.
If the Brocade SAN integration card is greyed out and appears in the Available Integrations section, click on the Enable button in the card and then wait for the integration card to complete its initialization and move to the My Integrations section.
Click View for the integration.
The Brocade SAN screen is displayed. If you have already configured other Brocade SAN integration instances, you will be presented with a list of existing instances. To add a new instance, click on the New button in the upper right-hand corner of the page. Otherwise, you will be presented with a New Brocade SAN page.
Enter a name for the integration discovery instance.
A name is required. The Name field can be edited after the configuration is saved.
Select the SANnav-SNMP Discovery mode.
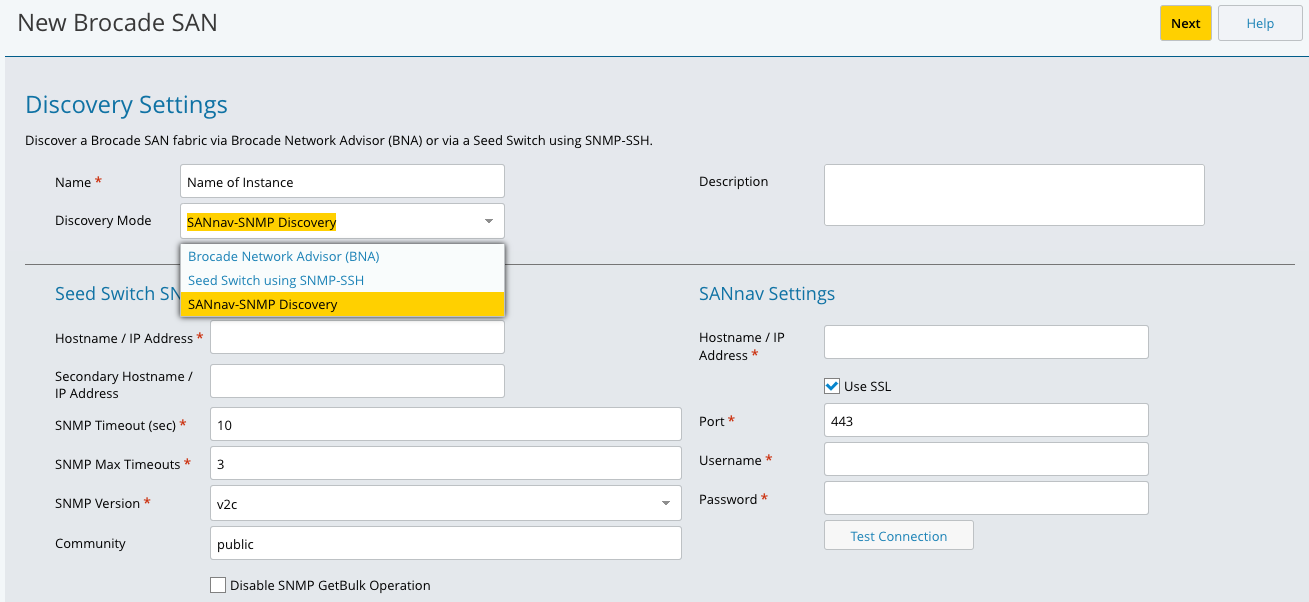
Complete the rest of the information on the New Brocade SAN screen as follows:
Field
Definition
Seed Switch SNMP Settings
Hostname / IP Address
(Required) Hostname or IP address of the SANnav instance.
Secondary Hostname / IP Address
Secondary Hostname or IP address of the SANnav instance, if applicable.
SNMP Timeout (sec)
(Required) The default SNMP timeout value in seconds for this integration instance.
SNMP Max Timeouts
(Required) The number of SNMP timeouts allowed until failure.
Disable SNMP GetBulk Operation
Checkbox; enable or disable SNMP GetBulk Operation.
SNMP Version
Select v1, v2c, v3 Auth Privacy, v3 Auth No Privacy, or v3 No Auth No Privacy.
Community
The default community string. This field will only display for SNMP v1 and v2c.
SNMP Username
SNMP username. Present for all SNMP v3 versions.
SNMP Auth Password
SNMP auth password. Present for SNMP v3 Auth Privacy and v3 Auth No Privacy versions.
SNMP Auth Protocol
SNMP auth protocol, either MD5 or SHA. Present for SNMP v3 Auth Privacy and v3 Auth No Privacy versions.
SNMP Privacy Password
SNMP privacy password. Present for SNMP v3 Auth Privacy version.
SNMP Privacy Protocol
SNMP privacy protocol, either AES or DES. Present for SNMP v3 Auth Privacy version.
SNMP Context Name
SNMP context name (e.g., VF:128). Present for all SNMP v3 versions.
SANnav Settings
Hostname / IP Address
The Hostname or IP address of the SANnav system.
Use SSL
Checkbox; enables or disables use of SSL for login.
Port
Port of the SANnav instance. If the SSL check box is selected, the port is 5989. If the SSL check box is not selected, it is port 5988.
Username
Username of the SANnav instance.
Password
Password of the SANnav instance.
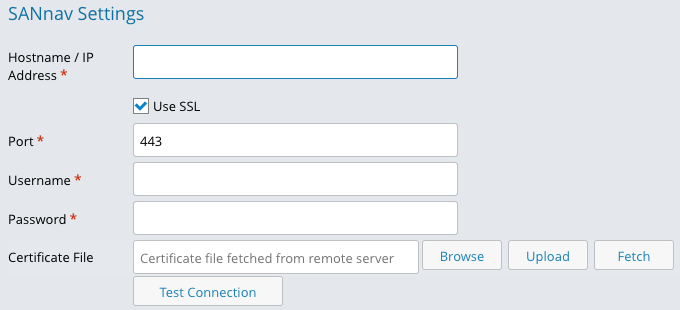
If the Use SSL check box is selected, you must either upload your certificate from your local system using the Browse button or fetch the certificate from your VMware vSphere system using the Fetch button. If the Use SSL check box is not selected, the Certificate File field is not present. Please see the SSL Certificate Handling section for more details.
Click Test Connection to verify the connection.
IO tests the connection (hostname and credentials). This process can take up to five minutes.
Click Next.
Discovery begins for all the switches accessible. This process can take several minutes, depending on the number of switches to be discovered.
The integration instance page opens to display the Configuration tab.
The fields from the previous screen are carried over. Some of them may still be edited (Name, Description, IP Address, Port, Username, Password); others are just displayed in plain text.
Enable or disable scheduled discovery.
By default, regularly scheduled discovery is enabled for Brocade SAN Integration configurations. If you would like to disable regularly scheduled discovery, uncheck the Enable scheduled discovery check box. If you would like to have discovery scheduled regularly, keep the box checked and choose a discovery frequency and time of day. By default, the frequency and time of day for Brocade SAN Integration is every other day and 2am appliance time.
Click on the SNMP Sources tab on the New Integration page.
A list of available auto-detected SNMP switch sources displays.
Select the switches you want to use with the integration and click Add.
You can configure multiple switches at one time. The columns headings in the Switches table are defined as follows:
Table 236. Switches Table FieldsFields
Definition
Switch Name
Auto-detected name of the switch.
Port Count
Active port count.
Status
Discovered, Configured, Subscribed.
Username
Switch username.
IP Address
Switch IP address.
Last Metrics Collection
Date and time of last metrics collection, Collecting metrics for metrics collection in progress, metrics collection failed, or no collection for no collection.
You are notified if an Integration fails to collect metrics for two hours. The notification takes the form of a IO Health Notification as well as an email notification.
Metrics Polling Interval
Metrics polling interval set for the switch.
Error
Configuration or subscription errors. Mousing over an error displays a tooltip containing the error text.
With the switches still selected, click Configure.
If you selected one switch, the Switch Configuration dialog box displays. Proceed to Step 14.
If you selected more than one switch, the Bulk Switch Configuration dialog box displays. Proceed to Step15.
If you select one switch, enter the values in the Switch Configuration dialog.
The Name, Vendor, IP, SNMPVersion are auto-detected. You can override the IP and SNMP Version. If auto-detect for the IP address failed, you must enter the IP address. Depending on the SNMP version detected, there might be more or less values to fill in.
The values in the other fields are filled out with default values. You can edit these fields, but it is recommended that you keep the default values provided. In some cases, such as when SNMP version 3 usernames and passwords are required, we cannot provide defaults, and you have to enter the information manually.
Proceed to Step16.
If you select two or more switches, select the properties to configure in the Bulk Switch Configuration dialog.
Click OK.
With the switches still selected, click Subscribe.
When you click Subscribe, IO validates that there are sufficient licenses.
Click Save to save all of your changes.
The Discovery dialog box displays, asking if you want the discovery process to start upon saving. Immediate discovery is recommended, as no metrics are collected until discovery is complete.
Click Yes to start immediate discovery.
After clicking yes, you are returned to the main grid of all configurations, and the integration that you just created has "Discovering…" in its last discovery time column.
If you drill down into the configuration again, a banner displays on your screen saying that discovery is taking place. While the discovery is taking place you are in read-only mode. You cannot make any changes to the integration or switch configuration.
Note
If discovery completes with the error, “Illegal action: attempt to associate archived parent,” re-run discovery on the integration configuration that failed for it to unarchive the port.
SSL Certificate Handling
This integration requires a secure connection to the target device, which can be achieved automatically if the device has a certificate that has been signed by a root certificate authority. If this is the case, you may complete the form and click the Next button to proceed to the next page of the configuration.
If your device does not have a properly signed certificate, you may associate a certificate (for example, a self-signed certificate) with the device using one of the two following methods.
Automatically fetch the certificate from the target system. A valid IP address and port number are required.
Upload the certificate from your local system.
The right-hand side of the first page of the Brocade SAN configuration looks like this:
Using Fetch to Automatically Retrieve a Certificate
Clicking on the Fetch button will trigger an action that will automatically fetch the certificate from the target system. There are two cases:
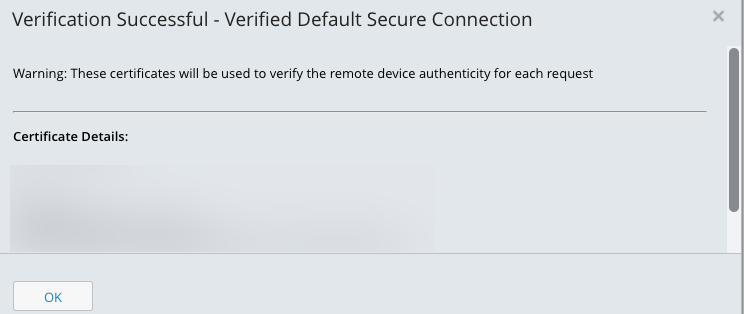
If the fetched certificate has been signed by a valid root certificate authority you will see a popup window with the details of the certificate as shown below. Press OK to continue configuration. Fill in the Name and authentication fields and click the Next button in the upper right hand corner of the screen.
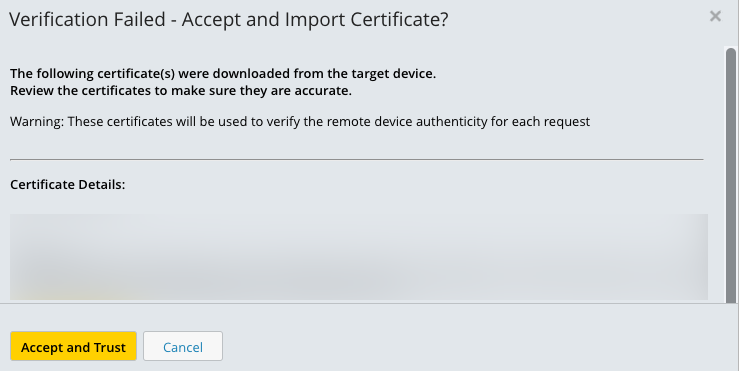
If the fetched certificate is, for example, a self-signed certificate, you will see a popup window with the details of the certificate as shown below. You may either Accept and Trust the retrieved certificate or you may Cancel. If you accept, the Certificate File field will be updated to display "Certificate file fetched from remote server". Fill in the Name and authentication fields and click the Next button in the upper right hand corner of the screen.
Uploading a Certificate
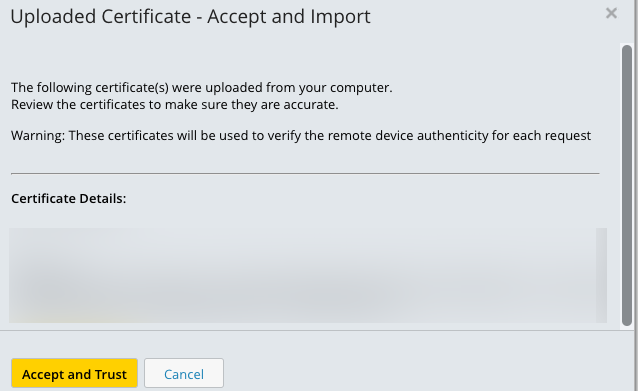
Clicking on the Browse... button will prompt you to upload a certificate from your local system. The Certificate File field will be updated to display the name of the uploaded file. Fill in the Name and authentication fields and click the Next button in the upper right hand corner of the screen.
Viewing the Locally Stored Copy of a Certificate
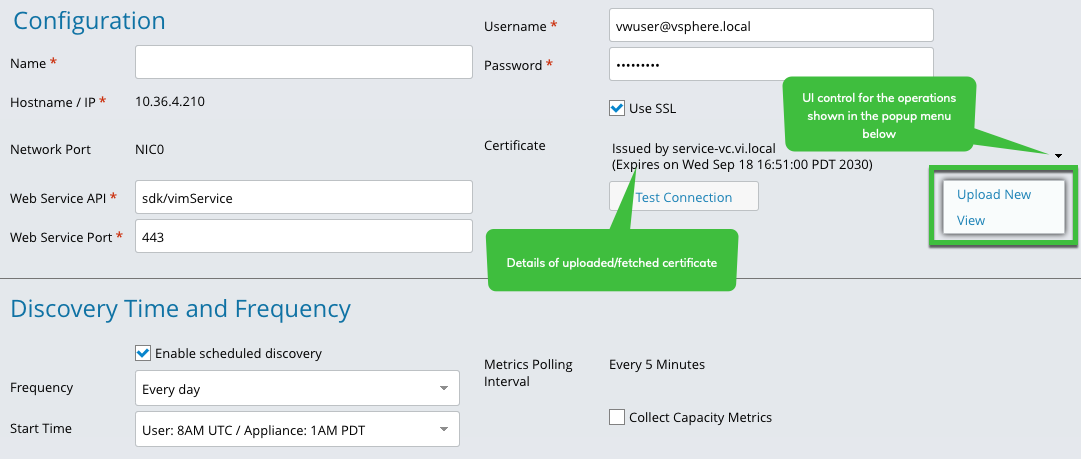
The second page of the Brocade SAN configuration provides UI elements that contain (1) details of the fetched or uploaded certificate and (2) a way to view the current certificate or upload a new/updated certificate.
Brocade SAN Integration Alias and Zone-Based Topology Matrix
Aliases are automatically imported during Brocade SAN Integration discovery if you are using any of the following supported combinations.
Vendor | Alias Type | Alias By | Zoned By | IO Naming* | IO Topology** |
Brocade | alias | wwpn | alias | yes | yes |
Brocade | alias | wwpn | wwpn | yes | yes |
Brocade | alias | wwnn | alias, wwnn | no | no |
Brocade | alias | wwnn | wwpn | no | yes |
Brocade | alias | port | alias | no | no |
Brocade | alias | port | wwpn | no | yes |
Brocade | name | wwpn | name | no | no |
Brocade | name | wwpn | wwpn | no | yes |
* Retrieves alias definitions from the switches that are used for WWN-to-name resolution
** Retrieves zone information that is used to define the intelligent topology within IO
Adding Switches to the SNMP Sources List
You can add switches to the SNMP Sources list either by using Quick Discovery or by using Add. If you add a switch to your infrastructure or a switch you expected to see in the sources list does not appear, you can run Quick Discovery to try to find it. If the switch is still not found, use Add to manually configure the switch.
On the SNMP Sources page, click the
 menu and select Quick Discovery.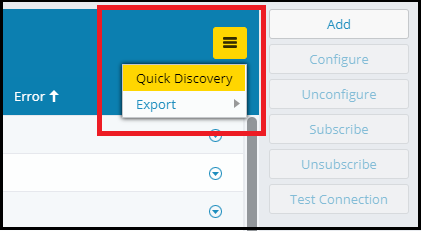
If IO discovers new switches, they are added to the SNMP Sources list.
If the switch you want is not discovered, click Add.
The Switch Configuration dialog displays.
Enter the configuration settings for the switch and click OK.
The status of the switch changes to Discovered.
Select the switch you added and click Configure.
When the switch is configured without errors, the status changes to Configured,
Select the switch you added and click Subscribe.
The status of the switch changes to Subscribed.
On the SNMP Sources page, click Save to retain your changes.
Click Start Discovery.
This begins a discovery of entities associated with the switch you added.
The status of the switch changes to Discovered.
Click Save to retain the changes.
Migrating from Brocade BNA to SNMP-SSH Discovery
Follow these guidelines to migrate from Brocade BNA to SNMP-SSH discovery:
Before upgrading IO, ensure that one successful discovery has been performed on IO.
Upgrade IO and perform a successful discovery on the Brocade BNA integration configuration.
Note
If discovery fails or is unsuccessful, contact Virtana Support.
Ensure that there are no duplicate entities in your Brocade BNA integration configuration. If you come across duplicate entities, do not proceed. Contact Virtana Support.
Delete the BNA integration configuration and ensure that all the entities are archived. If there is an error deleting the BNA integration, do not proceed. Contact Virtana Support.
Click new integration configuration and select Seed Switch using SNMP-SSH from the drop-down.
Create the SNMP-SSH configuration using the seed switch IP/Hostname. Provide the appropriate SNMP version and username as using your seed switch SNMP settings.
Verify that all the switches have been discovered in the SNMP Sources tab. If there are any missing switches:
Perform a quick discovery to discover the missing switches.
Add the missing switches using Add switch functionality. Provide the SSH and SNMP credentials to add the missing switches.
Repeat the process until all the switches are discovered.
Configure and subscribe the discovered switches.
Save the configuration and perform a complete successful discovery.
Ensure that the expected entities are created and there are no duplicate entities.
Modifying Entity Types for Brocade Switches
There are circumstances under which IO might assign a port as a different type than the one you want.
Content of Integrations Pages
Inventory Table
Column Heading | Definition |
|---|---|
Name | User-defined name for the integration, often the IP address or the type of integration. |
Subscription | Unsubscribed or Subscribed. For Brocade SAN Integration only, if subscribed, shows a ratio of the number of configured switches that are subscribed/the total number of configured switches. For example, 1/5 means that one configured switch is subscribed, out of 5 possible configured switches. |
Last Discovery | Date and time that the integration was last discovered, discovering or currently discovering, no discovery, discovery failed, or warned. For Discovery failed or Discovery warned, you can hover over the cell to view the error or warning as a tooltip. |
Last Metrics Collection | Date and time of last metrics collection, Collecting metrics for metrics collection in progress, Metrics collection failed for failed metrics collection, followed by a ratio of the number of failed subscribed switches to total subscribed switches, no collection for no metrics collection, or Warned followed by a timestamp and with no ratio, for a warning. For both failures and warnings, there is no mouse-over tool tip and the user has to drill down and see the failures /warnings in the switch grid. You are notified if an integration fails to collect metrics for two hours. The notification takes the form of a IO Health Notification as well as an email notification. |
At the end of each row is a down arrow, which, if you click it, provides a short cut to Configure, Test Connection, Start Discovery, or Delete the integration in the associated row.
License Summary Table
The License Summary button displays information on the total number of purchased, used, and remaining licenses.
Field | Definition |
|---|---|
Switch Ports | Number of switch port licenses: Total, used, and remaining |
Wire Data Link Credit | Number of wire data link credit licenses: Total, used, and remaining |
Switch Ports in the Brocade SAN License Summary dialog relates to the number of switch ports that are licensed, even though subscription is done at the switch level. Related to Brocade SAN Integration.
Content of SNMP Sources Pages
The column in the SNMP Sources table are defined as follows:
Fields | Definition |
|---|---|
Switch Name | Auto-detected name of the switch. |
Port Count | Active port count. |
Status | Discovered, Configured, Subscribed. |
Username | User with permissions on that switch |
IP Address | IP address of the switch |
Last Metrics Collection | Date and time of last metrics collection, Collecting metrics for metrics collection in progress, metrics collection failed, or no collection for no collection. You are notified if an Integration fails to collect metrics for two hours. The notification takes the form of a IO Health Notification as well as an email notification. |
Metrics Polling Interval | Metrics polling interval set for the switch. |
Error | Configuration or subscription errors. Mousing over an error displays a tooltip containing the error text. |
From the SNMP Sources page, you can perform the following actions on the switches listed in the table: Add, Configure, Unconfigure, Subscribe, Unsubscribe, and Test Connection.