Add a rule
Use this procedure to create a new rule. You must have the Manager role to create a rule.
Open the ADMIN > Actions page, and then click the RULES tab.
In the upper-right corner, click ADD RULE.
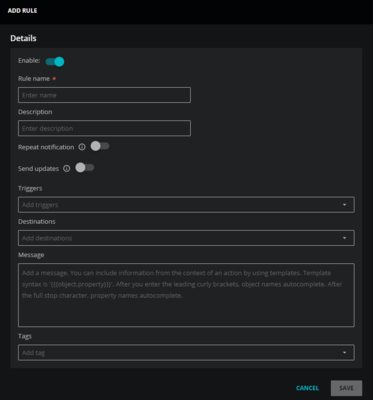
Specify the rule.
The following table describes the fields you can use to specify a rule.
Field
Description
Enable
This option determines whether the rule is active or inactive. The default is active.
Rule name
A unique, short identifier for the rule (required). The name can't be changed after the ADD RULE dialog box is saved.
Description
Text to describe the rule.
Repeat notification
This option determines whether to repeat the action (send notifications) each time a trigger matches. The default is not to repeat notifications.
When this option is turned on, the dialog box expands so you can specify a repeat interval. The interval suppresses notifications for matching triggers until the interval elapses. To ensure that notifications for all matching triggers are sent, set the amount of time to zero.
Repeat interval: The amount of time.
Interval type: The unit of time (Seconds, Minutes, or Hours).
Send updates
This option determines whether to send notifications when the conditions that previously matched a trigger change significantly, such as when an event is closed, acknowledged, or changes severity. The default is not to send updates.
Delay seconds
The number of seconds to wait after a trigger matches before sending a notification. The notification is sent only if the trigger still matches when the delay ends. Enter a value between 0 and 86,400 (24 hours). The default is 0, which sends notifications immediately.
The delay applies only to the first notification sent for a match. Repeated notifications and update notifications are not delayed, so this option is independent of Repeat notification and Send updates.
Use a delay to suppress notifications for conditions that resolve on their own. If an event closes before the delay ends, or a metric value stops breaching its threshold before the delay ends, no notification is sent.
Triggers
A list of triggers to associate with the rule.
Destinations
A list of destinations to associate with the rule.
Message
The text to send to destinations. You can include one or more templates in the text.
Slack and Webhook destinations receive the customized message defined in a rule, while email destinations receive the message defined in the Subject and Message body fields of a destination.
Tags
A list of terms to associate with the rule.
Click SAVE.
About notification delays
At the end of the delay, the action service re-checks the trigger. The notification is sent only if the trigger still matches. It isn't enough for an event to still be open: the event must still meet every criterion in the trigger. If a trigger filters on severity and the event's severity changes during the delay so that it no longer matches, no notification is sent. The same applies to a metric value that returns below its threshold during the delay.
This behavior lets you use delays to build an escalation path across several rules. Because a delayed notification is sent only when the condition persists, a longer delay effectively means "notify this group only if the issue is still unresolved."
To escalate, create one rule for each stage. Give every rule the same triggers, then give each rule the destinations for its stage and a longer delay than the stage before it. The following two rules escalate from a first-line team to an on-call engineer.
Rule 1: Set Delay seconds to 0 and the destination to the first-line operations channel. This team is notified immediately.
Rule 2: Set Delay seconds to 600 and the destination to the on-call engineer. This engineer is notified 10 minutes later, and only if the condition still applies.