Advanced Inventory Actions
This topic explains how to manage entities in Inventory. You can change the production state, set a priority, and create maintenance windows. These actions help you organize your work and keep your system running smoothly.
Update production state
You can add or edit the production state for one or more entities in Inventory. For example, you can update a production state of “Maintenance” to “Production” using the Update production state action. In the list of available production states, the check mark indicates the currently assigned state for the entity.
To learn more about production states and how you can use them in Virtana, see About production states.
Note
Updating production states for entities in Inventory doesn't impact the assigned production state for those entities in Collection Zones (CZ). For more information about production states in CZ, see Production states in Collection Zones.
To update the production state of one or more entities:
If you haven't already done so, navigate to Inventory and open or create a query.
Search your Inventory to locate the entity or entities that you want to update.
In your search results, select the checkbox next to each entity that you want to update.
In the toolbar, click More actions, then select Update production state.
Alternatively, locate the row with the entity you want to update, then click the More actions icon in the row and select Update production state.
In the menu that appears, choose a production state for the selected entity or entities.
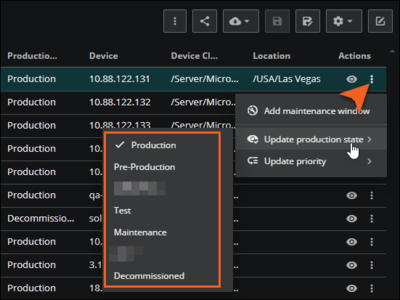
The entity updates with the selected production state. You can open the Details panel from the entity row to view the currently selected production state.
Priority
The priority of an entity indicates the degree of importance of that entity to your organization. Priority provides a relative measure of importance, such as “Low” or “High”, to help you narrow down a large set of entities.
For example, you might want to focus your work on just those entities that you’ve marked as “highest” in importance. The Priority field helps with this task by providing you with a set of relative measures.
Priority levels in Virtana include the following list, but you can add custom levels to meet your specific needs. “Normal” is the default priority level.
Highest
High
Normal (default)
Low
Lowest
Trivial
Update priority
You can add or edit the priority level for an entity in Inventory. For example, you can update a priority of “Normal” to “High” directly in Inventory using the Update priority option. In the list of available priority levels, the check mark indicates the currently assigned priority for the entity.
Note
Updating priority levels for entities in Inventory doesn't impact the assigned CZ Priority for those entities in Collection Zones (CZ).
To update the priority of one or more entities:
If you haven't already done so, navigate to Inventory and open or create a query.
Search your Inventory to locate the entity or entities that you want to update.
In your search results, select the checkbox next to each entity that you want to update.
In the toolbar, click More actions, then select Update priority.
Alternatively, locate the row with the entity you want to update, then click the More actions icon in the row and select Update priority.
In the menu that appears, choose a priority for the selected entity or entities. The check mark indicates the currently selected priority.
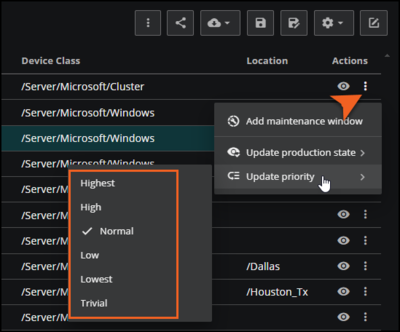
The entity updates with the selected priority level. You can open the Details panel from the entity row to view the currently selected priority.
Maintenance windows
You can schedule a maintenance window for a specific entity or a collection of entities. You might want to set up a maintenance window, for example, to perform configuration changes or reboot an entity.
Maintenance windows help you define a schedule for when to perform potentially disruptive actions on your entities, such as patching an operating system or installing software updates. Each maintenance window has a name, a schedule, a duration, and a set of targeted entities. You can also add tags to help you identify and sort your windows and entities.
When you create a maintenance window, you can define the notifications you receive during the duration. For example, you might want to notify your team when a maintenance window starts and then again when it ends. Use the Actions page when scheduling your maintenance window to set up these notifications.
Add a maintenance window
To add a maintenance window in Inventory:
If you haven't already done so, navigate to Inventory and open or create a query.
Search your Inventory to locate the entity or entities that you want to update. This query defines the criteria for the maintenance window.
Optionally, further define the number of entities to include in the maintenance window. In your search results, select the checkbox next to each entity that you want to include for maintenance.
In the toolbar, click More actions, then select Add maintenance window.
Alternatively, locate the row with the entity you want to update, then click the More actions icon in the row and select Add maintenance window.
In the ADD MAINTENANCE WINDOW dialog box, schedule your maintenance window and optionally create notifications for it. For more information, see Scheduling maintenance windows.
Delete multiple maintenance windows
You can delete multiple maintenance windows at once from Inventory.
Note
You must have admin access to delete maintenance windows.
Navigate to Inventory and run any query.
Select one or more maintenance window rows using the checkboxes.
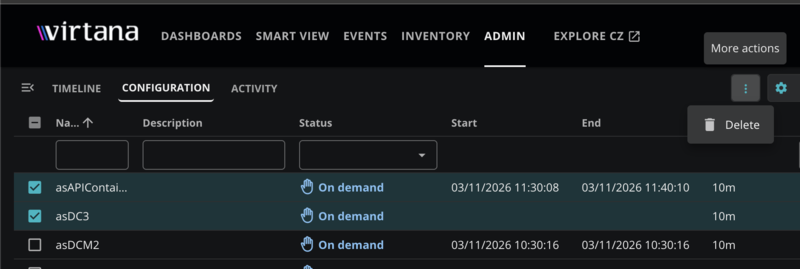
Click the three-dot menu (⋮) in the toolbar.
Click Delete.
Learn more
Click the links below to learn more about managing maintenance windows and notifications:
To learn more about maintenance windows and managing them for your organization, see Maintenance Windows.
For more information about setting up maintenance window notifications, see Setting up maintenance window rules and triggers.
To get started scheduling maintenance windows, see Scheduling maintenance windows.
Export query results
To download the table to your local machine, click the Export table button. You can export up to 100,000 rows of your Inventory table. Optionally, select the Email a copy checkbox to send a copy to your logged-in email address. This feature is useful for large datasets, ensuring reliable delivery and allowing you to perform other tasks while the whole table is processed.
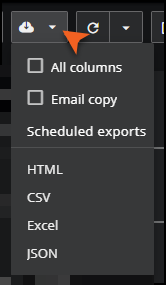
Decide if you want to download all columns, then select the format for the table. Keep in mind that selecting the All columns checkbox might impact the size of your exported file.
If you clear the All columns checkbox, then only those columns visible in the table are downloaded. These columns are selected in the ADJUST COLUMNS dialog box which you can open from Settings.
If you select the All columns checkbox, all the columns available in the ADJUST COLUMNS dialog box are downloaded, regardless of if they are selected or not.
If you selected to email a copy to yourself, look for the email sent from noreply@virtana.ai with the subject line Export: Inventory in your inbox. Open it and click the provided link to view your exported inventory table.
Learn more
About Inventory Learn how to navigate and manage items within the Inventory module.
Viewing query results Learn how to view and interpret the results of your queries.
Working with queries in Inventory Understand how to create, manage, and use queries within Inventory.
About production states Learn about different production states and how they impact Inventory items.