Configuring extension
This section explains how to configure Virtana Infrastructure Observability (IO) and Global View (GV) for use with MCP clients. MCP lets AI agents connect to Virtana product data through natural-language prompts, while each product uses its own endpoint and authentication method.
Configuring the IO MCP extension
To enable communication between your AI tool and the IO Server, configure the MCP service as an HTTP extension. This setup allows the AI component to interact securely with underlying IO APIs.
Add the Virtana IO Extension
To add the Virtana MCP extension, perform the following steps:
In the client application (for example, Goose client), open the left navigation and select Extensions.
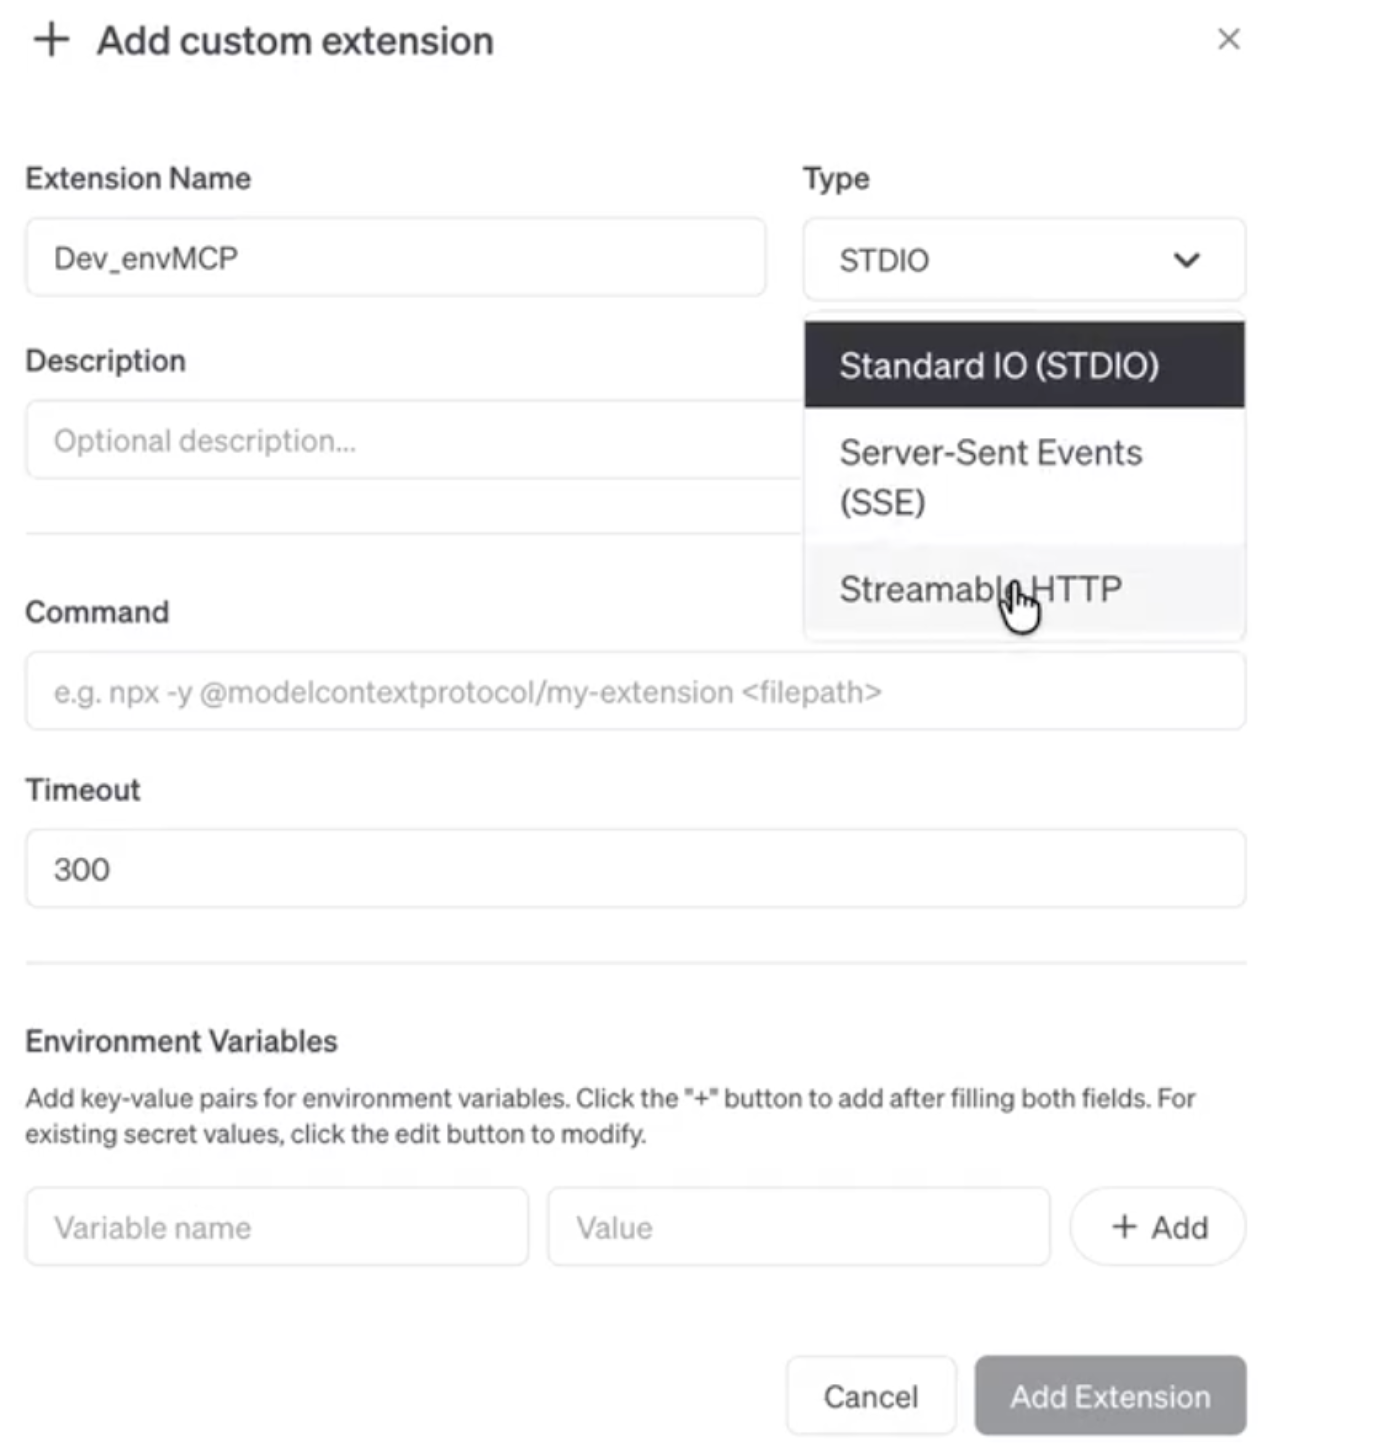
Click Add Custom Extension.
Enter the extension name and Enter the Type as Streamable HTTP.
Note
When you select HTTP as the type, the Endpoint options become available.
Enter Endpoint / MCP URL as: https://<io_server>/api/sdk/mcp/
Navigate to Request Headers and add the following header:
Header Name: Authorization
Value: Bearer <Your_IO_API_Token>
Optionally, give the extension a meaningful name, such as Virtana IO_Server, so users can recognize it easily.
Click Add Extension or Save to keep the configuration.
When successfully activated, you will see all enabled extensions.
Start Testing in Chat.
Note
Many MCP clients require that the certificates of secure endpoints (HTTPs) be a valid and fully resolvable certificate. If your IO server is using the default self-signed certificate configure a valid certificate for the IO instance, import the self signed certificate in to your application, or consider a reverse proxy. The best approach will depend on your environment and set up.
For detailed instructions on configuring AI capabilities in IO, see AI Configuration
Configuring Global View MCP extension
Use this section to configure Global View (GV) for MCP clients. Global View uses OAuth client credentials for authentication, and the MCP client connects to the Virtana MCP endpoint with those credentials.
Configure your client
Use the following MCP endpoint for Global View:
https://app.cloud.virtana.com/mcp
Add these request headers in your client:
client-id: <YOUR_CLIENT_ID>
client-secret: <YOUR_CLIENT_SECRET>
If your client supports multiple MCP servers, you can keep this Global View connection enabled alongside other Virtana servers in the same workspace or session.
Add the extension
In the client application (for example, Goose client), open the left navigation and select Extensions.
Click Add Custom Extension.
Enter the extension name and Enter the Type as Streamable HTTP.
Note
When you select HTTP as the type, the Endpoint options become available.
Enter Endpoint / MCP URL as: https://<your-platform-url>/mcp
Navigate to Request Headers and add the following header:
client-id: <YOUR_CLIENT_ID>
client-secret: <YOUR_CLIENT_SECRET>
Save the configuration.
Start Testing in Chat.
Example: adding extension support in Goose (Global View)
Note
The Goose client and OpenAI LLM provider are optional components. You can choose any MCP-compatible client and LLM provider that suits your environment.
Install and Set Up Goose
Download Goose Client from: Goose Client
Note
When adding the extension, ensure that your certificates are valid, and that Goose does not support self-signed certificates.
Extract and Install: Extract the archive if required, then run the installer executable.
Select Provider: Choose OTHER Providers, then select OpenAI as the provider type (LLM backend).
Choose Model: gpt-5.1 is recommended
Add the Virtana MCP Extension
To add the Virtana MCP extension, perform the following steps:
In the Goose client, open the left navigation and select Extensions.
Click Add Custom Extension.
Enter the extension name
Enter the Type as Streamable HTTP.
Note
When you select HTTP as the type, the Endpoint options become available.
Enter Endpoint / MCP URL as : https://<your-platform-url>/mcp (example:https://app.cloud.virtana.com/mcp)
Navigate to Request Headers and add the following header:
client-id: <YOUR_CLIENT_ID>
client-secret: <YOUR_CLIENT_SECRET>
Optionally, give the extension a meaningful name, such as Virtana Alerts MCP, so users can recognize it easily.
Click Add Extension or Save to keep the configuration. Start testing the integration in chat.