Configuring a ServiceNow Instance
IO discovers/imports applications directly from both local and cloud instances of ServiceNow Business Service, Manual Service, and Technical Services.
IO creates applications only from existing Hosts, VMs, Microsoft Hyper-V VMs, and PowerVM Partitions that have been discovered by other IO integrations.
Prerequisites
IO requires read access to the following ServiceNow database tables via the assigned ServiceNow user with the sm_user role.
cmdb_ci_service
cmdb_rel_ci
svc_ci_assoc
cmdb_ci_hardware
cmdb_ci_server
cmdb_ci_vmware_instance (if applicable)
cmdb_ci_hyper_v_instance (if applicable)
In order for IO to integrate with ServiceNow's incident infrastructure, the configured ServiceNow user must also have the itil role assigned to it.
Select an instance of a ServiceNow application (cloud or on-premise), and copy the URL.
Navigate to the Settings page and click Integrations in the Probes and Integrations section, and then click the View button for ServiceNow.
The ServiceNow page is displayed.
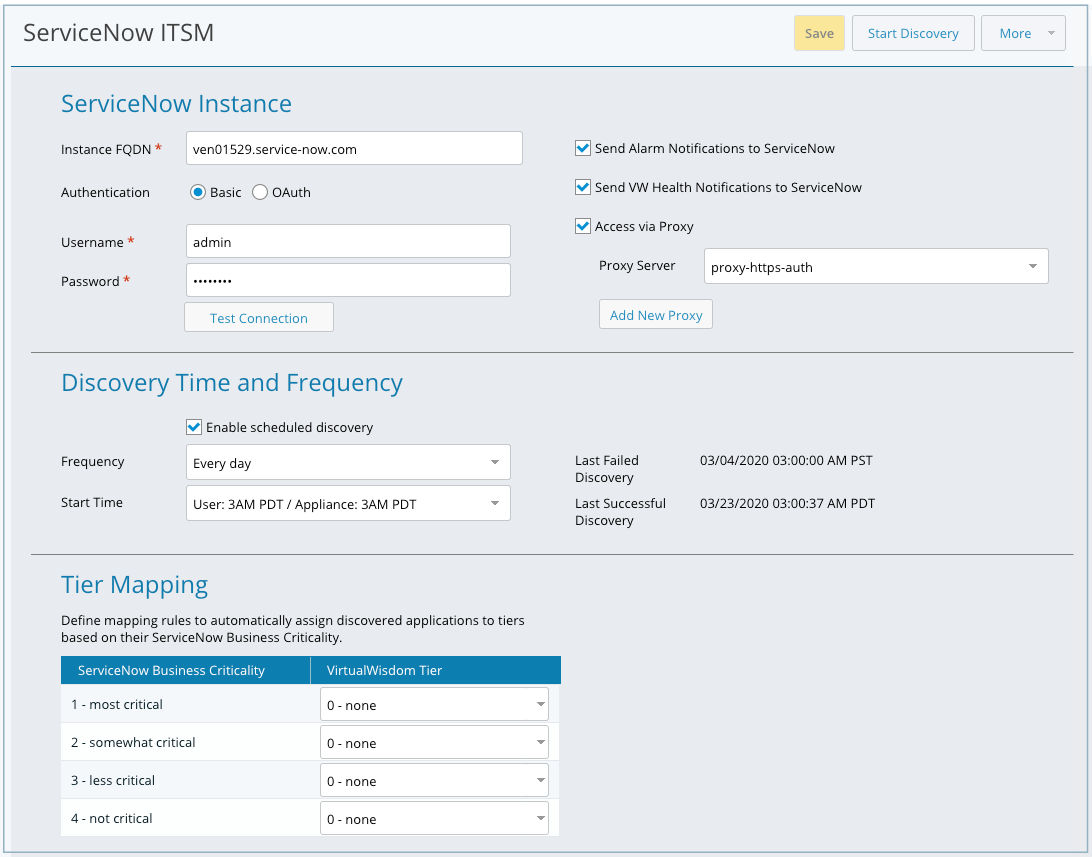
Paste the copied ServiceNow URL into the Instance FQDN field, and type your credentials in the Username and Password fields.
Select any optional items you want to configure for the instance.
If you select OAuth Authentication, you need to specify additional client information. The Client Secret key is displayed only at the time the OAuth token is generated.
You can also select the following: Send Alarm Notifications to ServiceNow and Send IO Health Notifications to ServiceNow.
Click Test Connection to verify that the specified URL and API Token can connect to the site successfully using the provided credentials.
Optional: Select Access via Proxy if your environment requires access to the internet through a proxy server.
You can select an existing proxy server or add a new proxy server.
Optional: Select Enable Scheduled Discovery and select the frequency and start time.
Optional: Assign a ServiceNow-discovered application to one or more IO tiers based on the ServiceNow Business Criticality ranking.

The default setting (none) does not map the ServiceNow levels to any tier, and you can select one or more tiers from the IO defaults or create your own tiers. For more information, see the following section, Create Application-Assigned Tiers.
Click Save and Start Discovery.
The specified ServiceNow application is discovered and optionally assigned to IO tier(s). If scheduled discovery was specified (defaults to Enable), it begins as specified in the Discovery Time and Frequency section, similar to existing integrations.
Changes in ServiceNow are updated in IO at manual discovery or the next scheduled discovery.
In a ServiceNow instance, when you discover virtual machine entities, it does not show the IP Address and FQDN in the VM entity, even though the IP address is linked under Network Adapter tab for that entity, IO is not addressing that table for its IP address. You can provide the IP manually in the IP address field and perform a discovery, in which case, the application is discovered.
After you create an application, you can drill down into it to see topology, application components, and FC conversations.
IO automatically pushes case information to ServiceNow.
Adding a Proxy Server
If your corporate security requirements include using proxies for internet access, you can add proxy servers to your integration configuration. Currently, ServiceNow is the only IO integration that supports proxy servers.
When configuring a new proxy server, clicking Test Connection confirms that the proxy server is listening on the port provided. If the proxy server uses basic authentication, the correct user and password must also be provided for the test connection to pass. If the proxy server does not require authentication, the user and password are ignored.
About This Task
You can select only one proxy server per integration.
Only Basic Auth is currently supported as an authentication method.
If you create an invalid proxy server, it will still display in ServiceNow.
If you select the invalid proxy, there is no indication it is invalid and that it will not connect. Ensure you use Test Connection when you create a proxy to verify the server is accessible.
If you delete or update a proxy server, ServiceNow is refreshed with the new configuration.
Prerequisites
To complete this task, you need the following information for the proxy server:
Server name
Protocol type: HTTPS or HTTP
IP address or hostname
Server port number
If the protocol is HTTPS, authentication is required so you must provide the username and password to access the server
Steps
You can access the proxy server configuration from the Settings page in either of two ways.
On the Probes and Integrations panel, click Integrations, then select View for ServiceNow ITSM.
In the ServiceNow Instance area, select Access via Proxy.
Click Add New Proxy.
On the Administration panel, click Proxy Servers.
Click New Proxy Server.
The New Proxy Server page displays.
Complete the configuration for the proxy server.
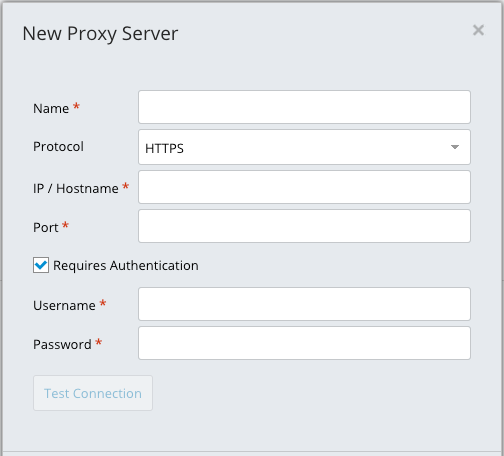
Only Basic Auth is currently supported for authentication.
Click Test connection to verify the proxy settings are correct and the server can be accessed.
Clicking Test Connection confirms that the proxy server is listening on the port provided and the integration can successfully communicate with the ServiceNow instance via the selected proxy server. If the proxy server uses basic authentication, the correct user and password must also be provided for the test connection to pass. If the proxy server does not require authentication, the user and password are ignored.
If you create an invalid proxy server, it will still display in ServiceNow.
Tip
If the proxy server cannot be accessed, the configuration can still be saved so that you can modify it later. However, there is no indication that a proxy is invalid. Therefore, ensure you use Test Connection when you create or modify a proxy to verify the server is accessible.