Setting up access between IO and Global View
To establish access between IO and Global View, you must have the client ID and client secret for the organization in the Virtana Platform to which you are connecting. After generating a set of unique credentials in Virtana Platform, you must enter the credentials in IO.
OAuth credentials are created for the organization in the Virtana Platform, used for login, and are exclusive to that organization.
Prerequisites
For IO data to display in Global View, the following prerequisites must be met:
You must have administrator privileges in both Global View and IO.
Your Global View account needs to be configured with a supported cloud provider instance.
The organization to which you intend to upload the IO export data must already exist in Global View.
Generate OAuth credentials
Ensure you have an active Virtana account. To set up IO and Global View integration, generate OAuth client credentials by performing the following steps.
Log in to your Virtana account and click Settings (gear icon).
In the side menu, click Integrations > Virtana Platform API.
Click Generate OAuth Client Credentials.
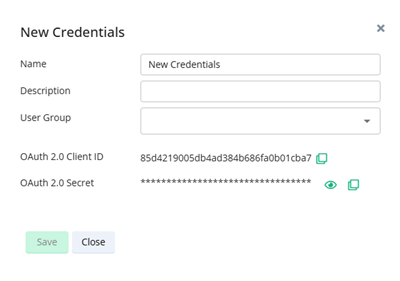
The New Credentials dialog box opens.

Enter a name and description for the credentials, and optionally assign a user group.
(Optional) If you need to remove credentials, perform the following steps.
Select and right-click on the credentials that you want to remove in the list.
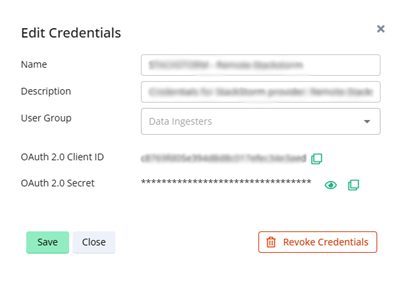
The Edit Credentials dialog box opens.

Select Revoke Credentials.
In the Revoke Credentials dialog box that opens, click Revoke.
The credentials are removed.
Click Save.
Integrating IO with Global View at a Glance
This section outlines the process for integrating IO with Global View.
To configure IO properties to integrate with Global View, restart IO Cloud Sync once properties are updated.
Ensure the vw.vp_base_url is correctly set to avoid connection failures.
IO Cloud Sync Integration Parameters (IO Cloud Sync service):
Property
Default Behavior
Action
com.vi.integrations.vcs.platform.regionDefaults to country (derived from the appliance’s TimeZone).
Use to explicitly set the region, for example,
USA.com.vi.integrations.vcs.platform.datacenterDefaults to city (derived from the appliance’s TimeZone).
If the city cannot be determined, it falls back to the hostname.
Use to explicitly set the datacenter, for example,
Boston.com.vi.integrations.vcs.tls.trust_all_certsCertificate validation is enabled by default.
When set to
true, all SSL certificates from the GV endpoint are trusted.Disable validation, as it is recommended only for testing or seamless connectivity.
com.vi.integrations.vcs.srclink_nameIf not set, the IP address is used in URLs sent to VP.
When specified, hostname is used instead. Require VCS restart.
UI Service Properties:
vw.vp_base_url=<GLOBAL VIEW URL>   ## e.g., https://gv.k8s.example.com/
com.vi.vp.tls.trust_all_certs=true
com.vi.ui.filters.exclusions.enable=true
com.vi.ui.enable.debug.options=true
SSO setup properties and configuration options required to enable and manage Single Sign-On (SSO) in Virtana Platform. These properties are typically set during SSO integration with providers such as Okta, Azure AD, or any SAML 2.0-compliant identity provider.
Configure an application in the SSO provider:
A SAML 2.0 provider can be, for example, OKTA. In provider one needs to add an application, and provide:
SSO URL, for example,
https://[FQDN]/api/sec/saml/login,Audience URL, for example,
https://[FQDN]/, application username as email.
Once the application is created on the SSO provider, it will generate
  idp.entityId:
  idp.ssoUrl:
  idp.x509Certificate:
The attribute with the name ‘name' is accepted for new user creation. If not found, it will use the subject, i.e., email ID, pretext before the character '@’, for example, firstName.lastName@companyName.suffix.
The attribute with the name 'groups' is accepted for group assignment. The given group names are searched in IPM and assigned to the given user.
To log in with the SSO-generated IdP, see the section Log in with SSO.
On successful login, the SSO provider will redirect the page back to the VP SAML login link. With this, VP will validate SSO details, and upon successful validation user will be taken to the appropriate landing page.
Enable CloudSync. Setting this property is essential while connecting to Global View, so make sure to set it first in the UI service.
Use the client ID and client secret (see Generate OAuth credentials) in the IO appliance at:
https://<IO appliance>/#settings/connect-to-virtana-platformEnsure the connection is successful before proceeding.
In Infrastructure Observability, click Settings, and then click Connect to Virtana Platform. Depending on the status of your connection, do one of the following.
If no connection exists to a Virtana Platform organization:
Add the OAuth 2.0 client ID and client secret for the target organization in Virtana Platform.
Click Validate & Connect.
A confirmation message informs you that the connection was successful.
If a connection already exists to a Virtana Platform organization:
Click Connect to a different organization.
Add the OAuth 2.0 client ID and client secret for the target organization in Virtana Platform.
Click Validate & Connect.
A confirmation message informs you that the connection was successful.
IO does not retain a copy of the content that is uploaded to Global View. If you want to retain a backup copy, download the generated content.
For more details, refer to this Virtana Platform process.
Verifying if IO Data Appears in Global View
This section outlines the verification steps to ensure a seamless connection has been established between IO and Global View.
Activate IO Cloud Sync Service.
Ensure the IO Cloud Sync service is running by navigating to Settings > Service Properties > IO Cloud Sync, and verify that the IO Cloud Sync service is running.
Set up the collection of data metrics.
Data metrics should be successfully collected by at least one integration in IO, meaning collection and discovery must occur without issues. This ensures that IO captures essential data for monitoring.
Configure Alarms in IO
Create a property-based alarm rule:
Go to Alarms > Rules > New > Property.
Select entities and properties, set filter criteria, and define rule logic (AND/OR).
Save the rule; it will appear in the rules list with the template set to 'property'.
Cases are generated as per the rule criteria.
Once an alarm is triggered in IO according to configured rules, it will appear as an alert in the Global View Alerts dashboard.
Check the Capacity Dashboard
Navigate to:
Global View > Dashboard > On-Premise Storage Array Capacity Summary,
Global View > Dashboard > On-Premise VM Compute Capacity Summary.
Verify if the data is displayed accurately.
Caution
Set all required property values before enabling CloudSync.
Important
The datacenter set in the parameters will display as the site property on the array capacity pages.