Editing Cost Meter Cards
You can edit and update a Cost Meter Card when you need to make a change. For example, you can open a card to adjust the billing period dates or add new charge information to the card. This is useful when new or unique information comes in that you want to track for a card. This task assumes you are logged in to Virtana Global View.
To edit a Cost Meter Card, perform the following steps:
Select the meter card that you want to edit from the list of cards.
The Update Meter Card window opens.
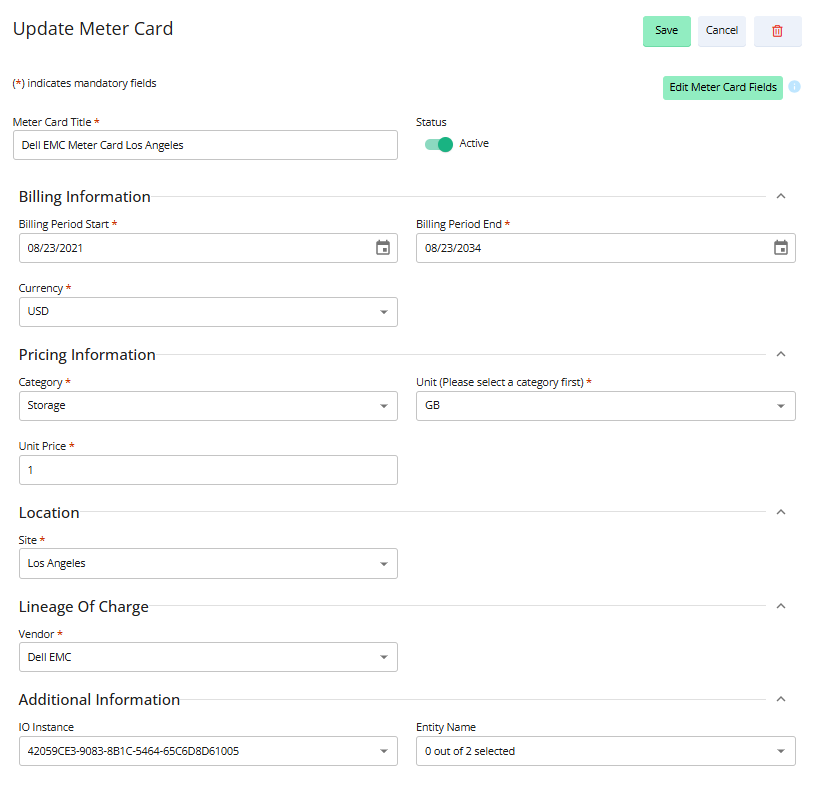
Use the following table to learn the description of each field provided in the Update Meter Card dialog box.
Table 12. Meter Card Fields and their DescriptionField
Description
Meter Card Title
User-defined title for the Meter Card.
Billing Information
Billing Period Start
Timestamp indicating the start of the billing period.
Billing Period End
Timestamp indicating the end of the billing period.
Currency
Specifies the currency code, for example, USD, INR.
Pricing Information
Category
Identifies the category of the Meter Card, for example, compute, or storage.
Unit
Specifies the vendor-defined measurement unit.
Unit Price
Indicates the cost as per the defined units of the Meter Card.
Location
Site
Name of the isolated geographic area where the resource or service is provisioned.
Lineage of Charge
Vendor
Identifies the entity that made the resources or services available.
Additional Information (Optional)
IO Instance
System-generated universally unique identifier associated with a specific appliance or device.
Entity Name
Descriptive name or label representing the resource, service, or organizational entity related to the charge.
Update the existing field values in the Update Meter Card window, for example, update the billing information.
Optionally, click the Edit Meter Card Fields tab to open the Add More Fields window.
Here you can add more fields to your card. This is useful when you receive unique information that you want to track in the card. You can add, edit, or remove these optional fields. For example, if you want to add new charge information, you can add the fields to the card.
Select the field you want to add to the card.
When you select a field using the category dropdown menu, both the category and the field are added to the card. For example, if you select Charge Period in the Charge category, the Charge category now appears on the card with the selected fields. For the list of categories and fields you can add, see Cost Meter Card Optional Fields Description.
Figure 2. Add More Fields window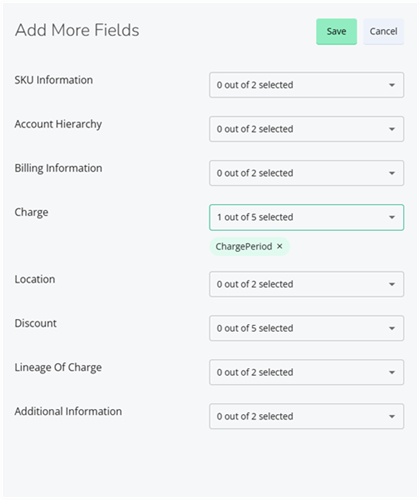
Use the following table to add fields to your Cost Meter card.
Table 13. Optional Fields descriptions for Cost Meter CardCard Category
Optional Fields
SKU Information
SKU ID: Unique identifier for a specific AWS service or product offering used for billing and cost tracking.
SKU Price ID: Identifier linked to the pricing details of an AWS SKU, representing a unique rate or price point for that service.
Account Hierarchy
Sub Account ID: AWS account ID of a child account within an AWS organization, often used for consolidated billing and resource segregation.
Sub Account Name: Readable name or label assigned to a sub-account under an AWS organization for easier identification and management.
Billing Information
Account ID: The unique 12-digit identifier for your AWS account incurring the charges.
Account Name: The user-assigned display name for the AWS account, used for easy recognition in reports.
Charge
Charge Period: The start and end dates represent the time window the charge applies to.
Frequency: Depicts how often the charge recurs, for example, one-time, hourly, or monthly.
Cost Category: User-defined or AWS-defined labeling used to group or organize costs for analysis.
Class: Indicates the classification or type of charge, for example, usage, recurring fee, or tax.
Description: A textual explanation providing details about the charge, such as service type or resource usage.
Location
Region ID: Identifier for the AWS geographic region, for example, us-east-1, where the resource is located or the charge is incurred.
Availability Zone: AWS always capitalizes Region, so AWS Region.
Discount
Discount Category: Type or classification of the discount, for example, Reserved Instance, Savings Plan, or promotion.
Discount ID: Unique identifier assigned to the individual discount applied.
Discount Name: Human-readable label or name for the discount.
Discount Type: The method by which the discount is applied, for example, upfront, recurring, or usage-based.
Discount Status: Current state of the discount, for example, active, expired, or pending.
Lineage of Charge
Publisher: The entity or provider responsible for the service or product, often AWS or an AWS Marketplace Seller.
Invoice Issuer: The organization or partner that generates and issues the billing invoice for the charges.
Additional Information
IO Instance: System-generated universally unique identifier associated with a specific appliance or device.
Entity Name: Descriptive name or label representing the resource, service, or organizational entity related to the charge.
After you make your selections, click Save to return to the card.
Note
To remove optional fields in a card, click the X next to the field name that you want to delete in the Add More Fields window.
Optionally, click the dropdown menu of the category, clear the check box, and click Save.
On the Update Meter Card window, click Save.
When you open the card, you can view these new or updated fields. These changes are also visible to other users in your organization.